Month: September 2014

Astrophotography On a Dime – or at least, a healthy stack of dimes…

When people think of astrophotography, most will think of some elaborate set up with either an expensive CCD camera or DSLR mounted at prime focus on an even more expensive, large telescope with a computerize mount. To be fair, in this age where technology geared towards astronomy is relatively cheap compared to what it used to be even 15 years ago, equipment like this is within reach of most amateurs willing to save their money for a while. It’s expensive when all the bits and bobs are added up, but none of the individual components required are necessarily to get good results are  too expensive on their own unless you’re buying really high end gear. The technological revolution has made astrophotography accessible to almost anyone.

For centuries, sketching was the only way that astronomers could document what they saw through the telescope eyepiece. And it was the only way common folk would ever get to see the celestial sights that were otherwise too faint to see with the naked eye. And of course, the quality of these sketches were very dependent on the artistic and observational skills of the person doing the sketching. I have zero artistic talent with a pencil, so this is a lost cause for me. And many people fall into this same category. Since photography became more accessible to the general populace, sketching is less common and is somewhat of a lost art these days.

Before the advent of the DSLR camera or CCD imagers, choices were limited. Astrophotography with an SLR was the simplest, cheapest form, but a chore nonetheless. A lot of people had 35 mm SLR cameras, and you could get basic models for pretty reasonable prices. The simplest form of astrophotography (as it still is today) was just plain wide angle star field photography on a tripod. You pointed, your SLR at your desired target, locked the bulb open manually, and carefully removed the lens cap. You’d then time your exposure for as long as you could without getting star trails (using the Rule of 600 ) and you hoped for the best. It was a tedious process, to say the least.

Mounting the camera on an “inexpensive” (relatively at the time) manual or motorized equatorial mount was a great way to get some impressive long exposure images. But due to the cost of these mounts, people with more modest budgets preferred to build their own manual “barn door tracker”. For those fortunate enough to own a telescope with a solid, good quality mount equatorial mount with a motor drive, they were really rocking the Cadillac-grade equipment of the astrophotography world. Prime focus photography became  a very practical option, but you needed to be a pretty experienced photographer to get good results.

With film, you had to know how to use your gear, because there were no “test shots”. You had to get it right the first time. It was a mix of trial and error and using exposure tables to know how to shoot objects. Your focus had to be perfect, as with your framing of your subject. And you wouldn’t know if you got good shots or not until you got the film developed and prints made. It was a long, tedious process, and simple mistakes due to inexperience could end up with a roll of ruined shots. And bad shots back then cost money, both in terms of buying film and getting it developed. And in these pre-Photoshop days, there was no post processing. What was on film was what you got. Today we can take hours worth of exposures over different sessions and stack them together to produce our images. Film was limited to single exposures, and the longer you kept the shutter open, the less sensitive the film became to light, something known as “reciprocity failure”. 
In the mid 90s, CCD imaging became more accessible to the hardcore amateurs who had deep pockets. Many companies like Meade and SBIG, amongst others, started producing more “consumer level” CCD cameras. But being a new technology, these were rather expensive. And with the camera, you now also needed a computer in the field. Laptop computers of that era were very slow and underpowered compared to desktop computers, their battery life was limited, and they basically cost a small fortune. CCD chips had a very small surface area compared to 35 mm SLR cameras, had low resolution of 640 x 480 or 800 x 600 at best, and were monochrome only. 
These cameras weren’t cheap – often costing $1000 or more – but significantly cheaper than the high end professional grade CCD cameras that cost many times as much. Even these higher end camera still had very limited resolution, often little less than 1024 x 768, and the majority were still monochrome.  So with these new CCD cameras, you could either take just monochrome images, or you could use colour filters to capture individual RGB / LRGB frames and then later combine them digitally in Photoshop to get a final colour image.

The early 2000s became a real boon for astrophotography, putting it within reach of just about anyone. DSLR cameras were being introduced and even the lower end, affordable models had a rich enough feature set to make them suitable for astrophotography. Of course, higher end, professional DSLRs will work better, but it gave people the option to get into the dark art of astrophotography without having to sell their kids into slavery to afford it. Besides, a lot of people dabble in photography and already had one of these cameras.

Dedicated CCD cameras are also more reasonably priced. They’re about on par with the cost of a decent, mid-range DSLR, and are now available in colour as well, although monochrome + filters will still offer the best detail and resolution. With laptop computers these days being quite powerful and reasonably cheap and with almost everyone owning one, the inaccessibility of this type of imaging due to cost.

But the real advantage of the CCD revolution was what we enjoy today. CCD is far more sensitive than film. A 1 minute CCD exposure taken today will yield the same results that a 30 minute exposure would have with film. And we’re now able to take test shots to frame our subject properly. If we get a bad shot, we can discard it, make necessary adjustments, and start over again.

We also don’t have to worry about reciprocity failure. With even modest equipment, we can acquire data from a target over hours or days and then stack the exposures together with various software packages to capture amazingly detailed images that even 20 years ago were only possible from space-based telescopes. And the post processing options available via Photoshop or other image editing software is almost limitless. And with minimal investment, really almost anyone can do it. 
With this prelude and brief history of astrophotography out of the way, it’s time to talk about what I intended in this blog – a basic set up for astrophotography that won’t break the bank.
A DSLR camera of some flavour is definitely the preferred option, although there are some point and shoot cameras that have manual modes that can be used for basic astrophotography. I have a Panasonic point and shoot with a full manual mode that can do 30 second exposures. It’s definitely not ideal, but since many people have these cameras already, it can definitely be used as a stepping stone into more serious astrophotography.

And we now also have the option of afocal photography – taking images of what we see in the eyepiece with a camera. There are several mounts available on the market that will couple point and shoot cameras or smartphones to the telescope eyepiece. This is best suited for bright solar system objects, but it goes to show how far we’ve come in the last couple of decades.

The most basic set up is much like it used to be back in the day – a camera on a tripod with a standard sub-100 mm lens. This will produce good results with star fields. And with proper exposure times, one can even use higher focal length lenses to shoot bright deep sky objects like M31, M33, M42, or M45. A good number of short exposures (within the Rule of 600 limit) stacked with proper calibration frames will produce reasonable images of a target, albeit small and with limited detail.

For better, higher magnification shots, a tripod isn’t enough. You need a tracker of some sort to counter for the rotation of the Earth. The manual barn door tracker I mentioned earlier is still an option for star field or Milky Way shots with short focal length lenses, but due to the high sensitivity of the CCD over film, it’s easy to shake the mount while taking your exposure. Using high focal length lenses of 200 mm or higher, the smallest vibrations you introduce will be magnified and will show up in your image, making this impractical at best.

Fortunately, there are many ways around this. If you’re fortunate to already have a telescope with a motor drive or go-to functionality, you already have this. You can easily piggyback mount your camera to your scope with relatively cheap adapters. Many scopes on the market from Celestron, SkyWatcher and Orion already have a camera mount built into the tube rings.  If your mount has a dovetail-type connector to attach the telescope tube, you can get inexpensive dovetail-type camera adapters and use it directly.

But if you don’t have this, then you need a tracker. If you’re on a budget, the best back for the buck would have to be the iOptron SkyTracker. This little unit is relatively inexpensive at about $400 MSRP for the basic model – about $450 with the optional polar scope, it’s a great deal for anyone that wants to shoot the sky without the expense of an expensive telescope with motorized mount. When carefully aligned, it will allow you to track for up to several minutes using a 300 mm lens on your camera. This can get you very impressive shots of the sky. I’ve gotten 3 minute exposures with a 300 mm lens, and I’m sure I could get more. I just haven’t tried yet.

Vixen also make a very comparable product called the Polarie which is very similar in design and performance, but a bit more expensive and their optional polar alignment scope is not included and costs significantly more than the iOptron’s. So for the money, this is most peoples’ ticket to long-exposure astrophotography on a budget. I did a full review of the SkyTracker last year. You can read it here for more information.

For something a little heavier duty iOptron also recently released the SkyGuider. This tracker is a small motorized equatorial head with counterweight that can handle significantly more weight than the SkyTracker – even accepting smaller telescope tubes. It also has an auto-guider port to use a guide scope and camera to make tracking even more precise. Auto-guiding is really out of the scope of this blog entry, but for those of you who don’t know what it is, it’s basically a way to compensate for mechanical imperfections in a mount’s gears ensuring perfect tracking over long periods of time. At $480 MSRP, it’s also a great choice for the budget-minded astrophotographer. And honestly, if you’re going to spend $450 for the SkyTracker and compact, lightweight portability isn’t of major concern to you, I’d strongly recommend paying the extra $30 to get one of these, as they expand your possibilities significantly, as it’s a proper German equatorial mount design. It will allow you to use the platform with a scope or guiding down the road and still retain decent portability and small size. The SkyTracker is the better option if portability is your primary concern.

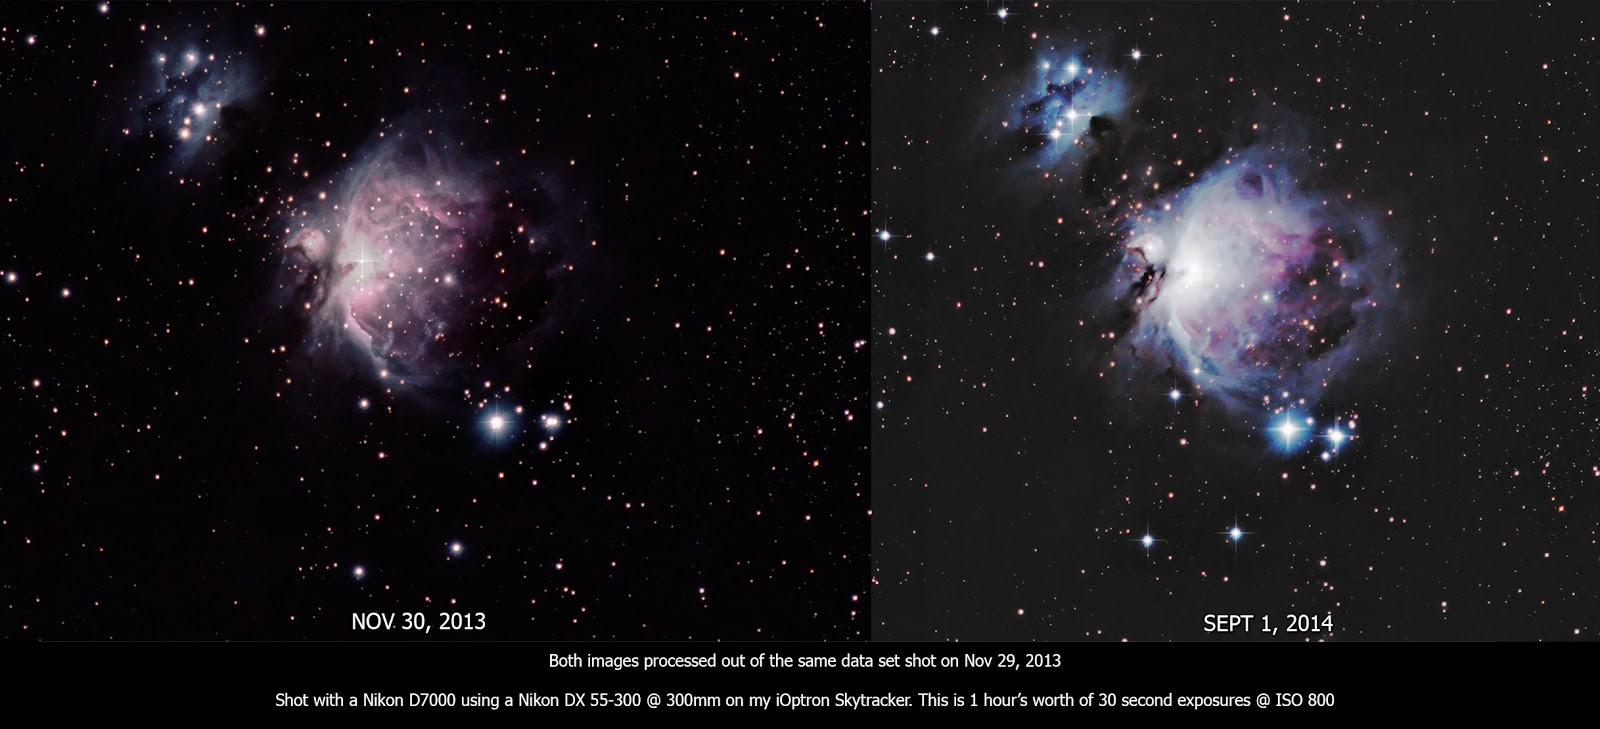
And how well do they work? GREAT! I’ve taken some really great images with my SkyTracker. I’d even say some of my best images were taken with it. The shot of M42 below was one of the first I took with my it. I recently reprocessed the original data to test out new processing techniques I’d learned, but the image was original shot last fall and the original version was featured in my review linked above.

Flickr link: https://www.flickr.com/photos/crunchmeister/15126222377/

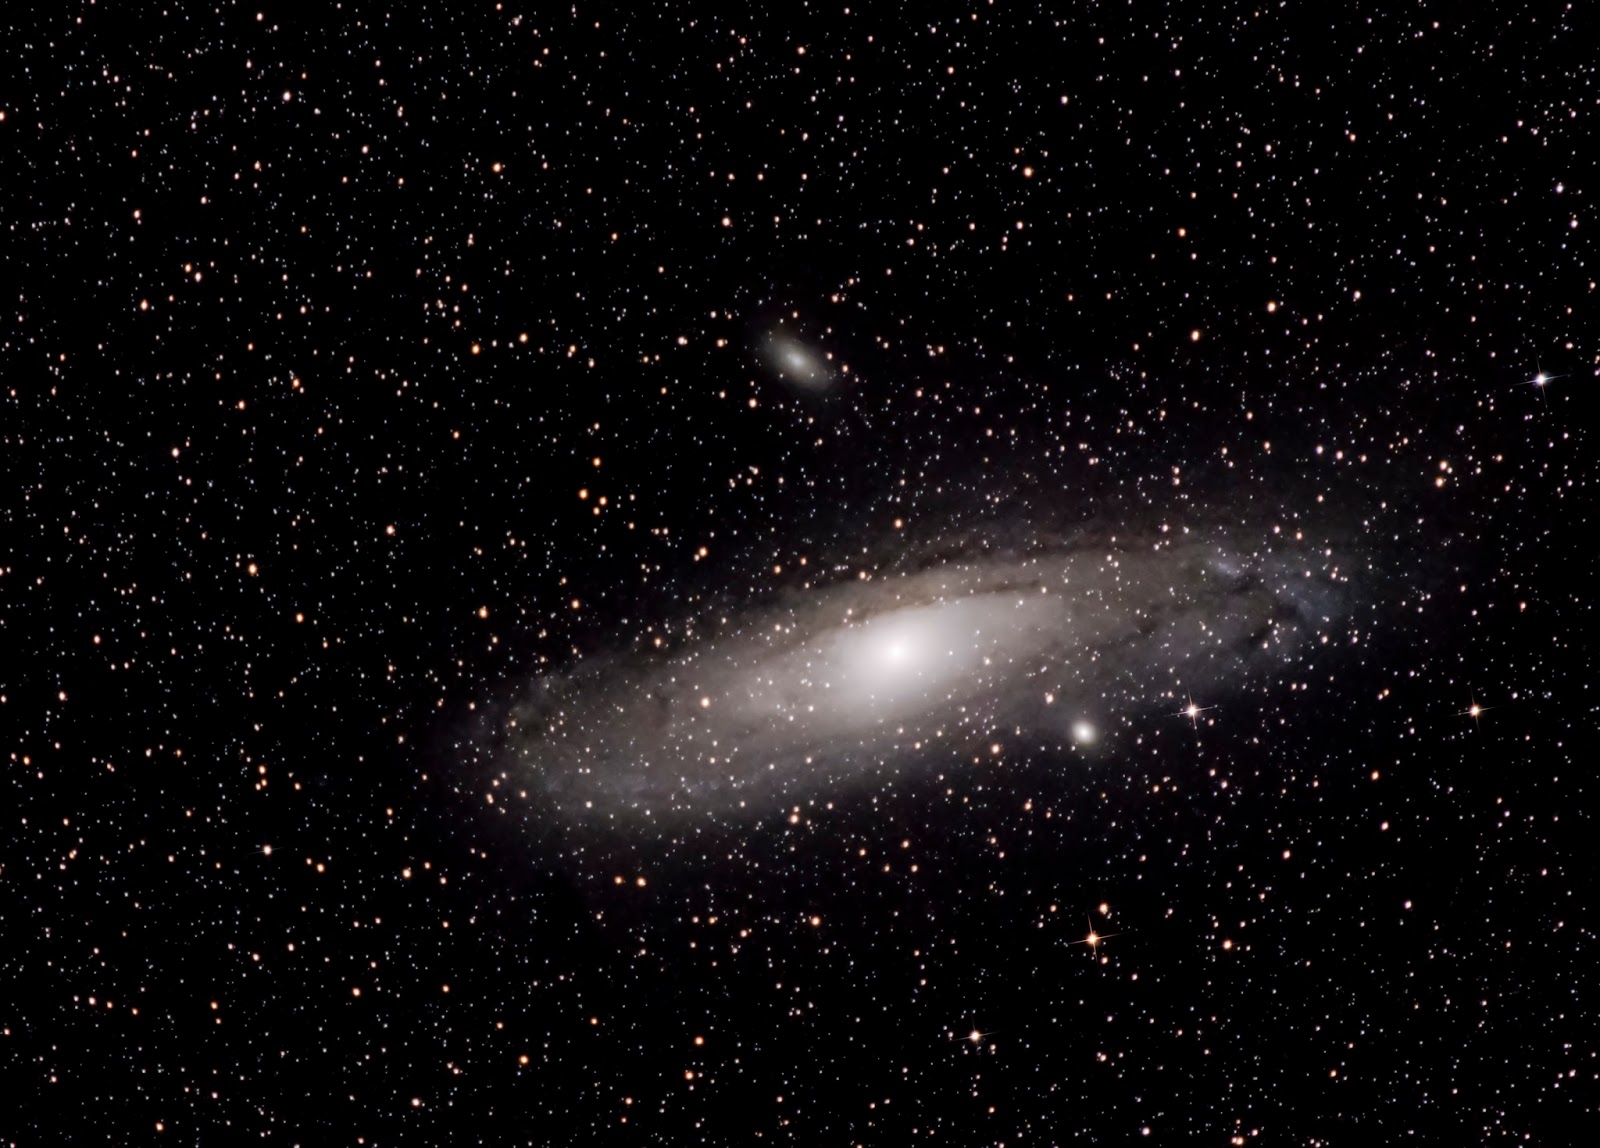
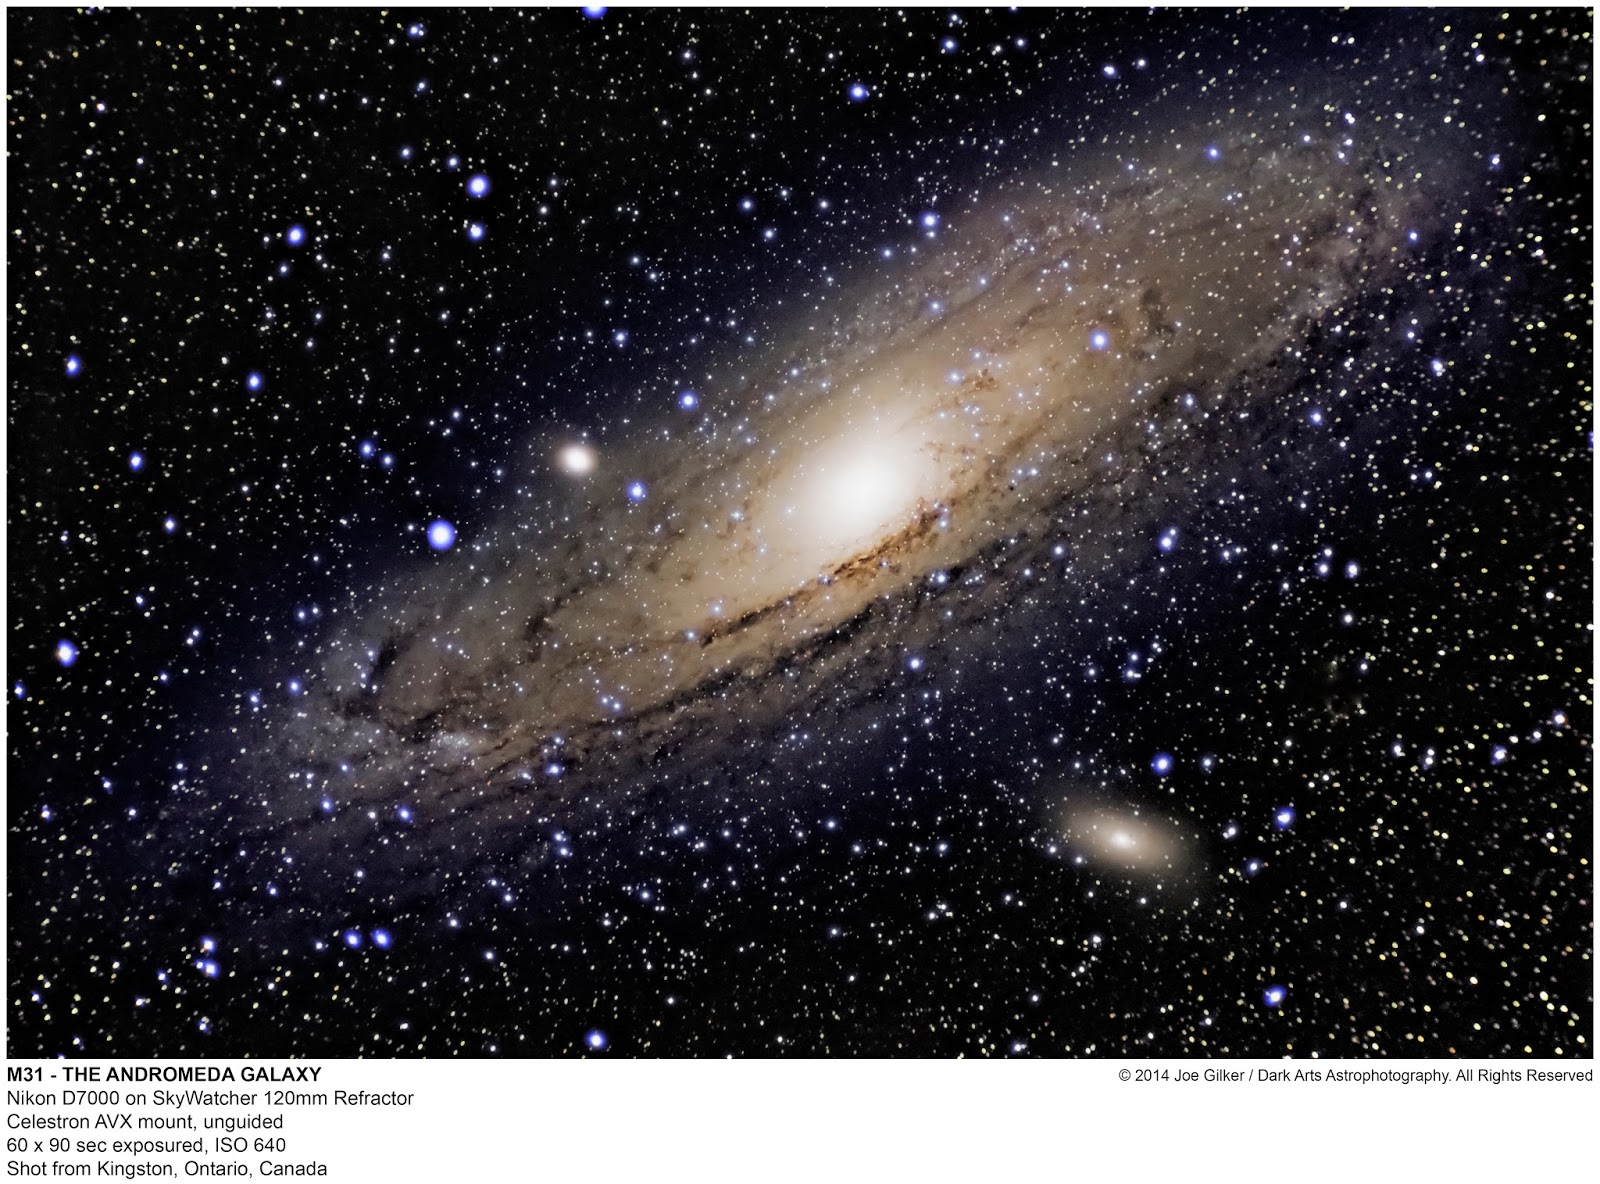
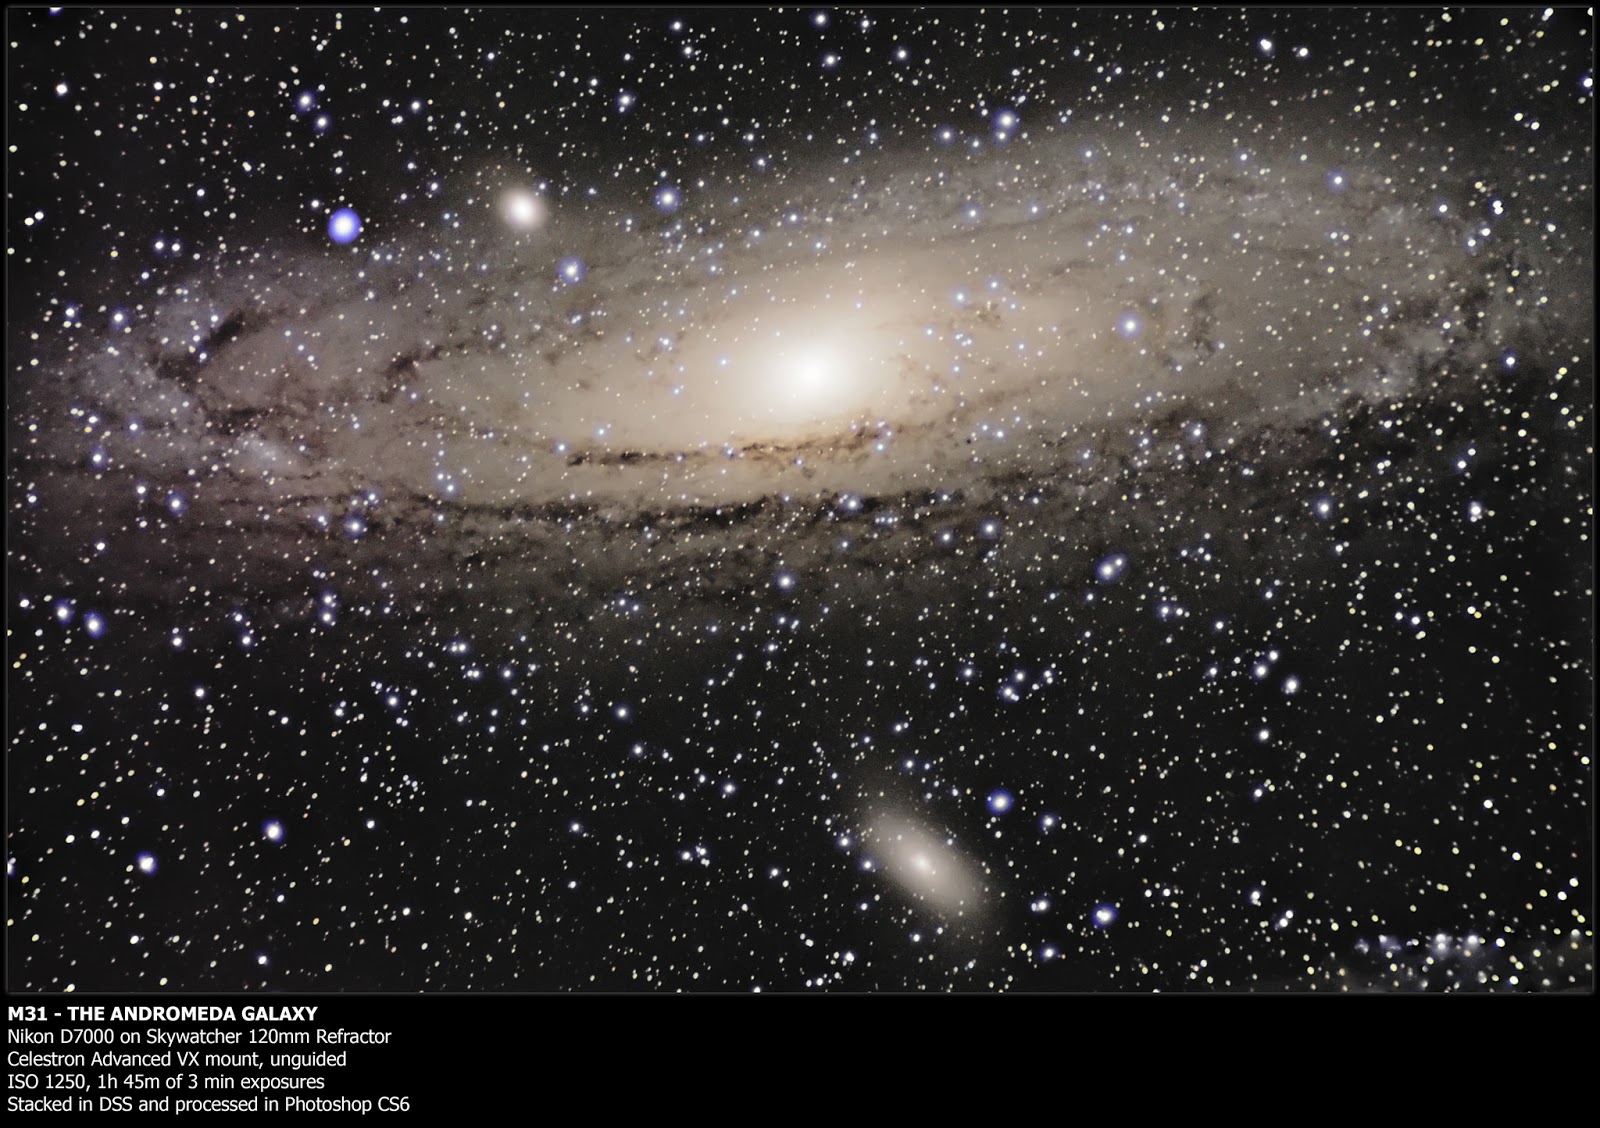
This shot of M31 is my most recent at the time of writing this.( I was actually shooting this image in the field last night while sitting in my car and typing the majority of this blog on my laptop.) My skills at post-processing have increased significantly since the last time I’ve used the mount for deep space imaging, but the final image is very reliant on good, accurate data. And as you can see here, the data is very good, despite the short, 1 minute exposures and only 22 minutes of combined exposure time.
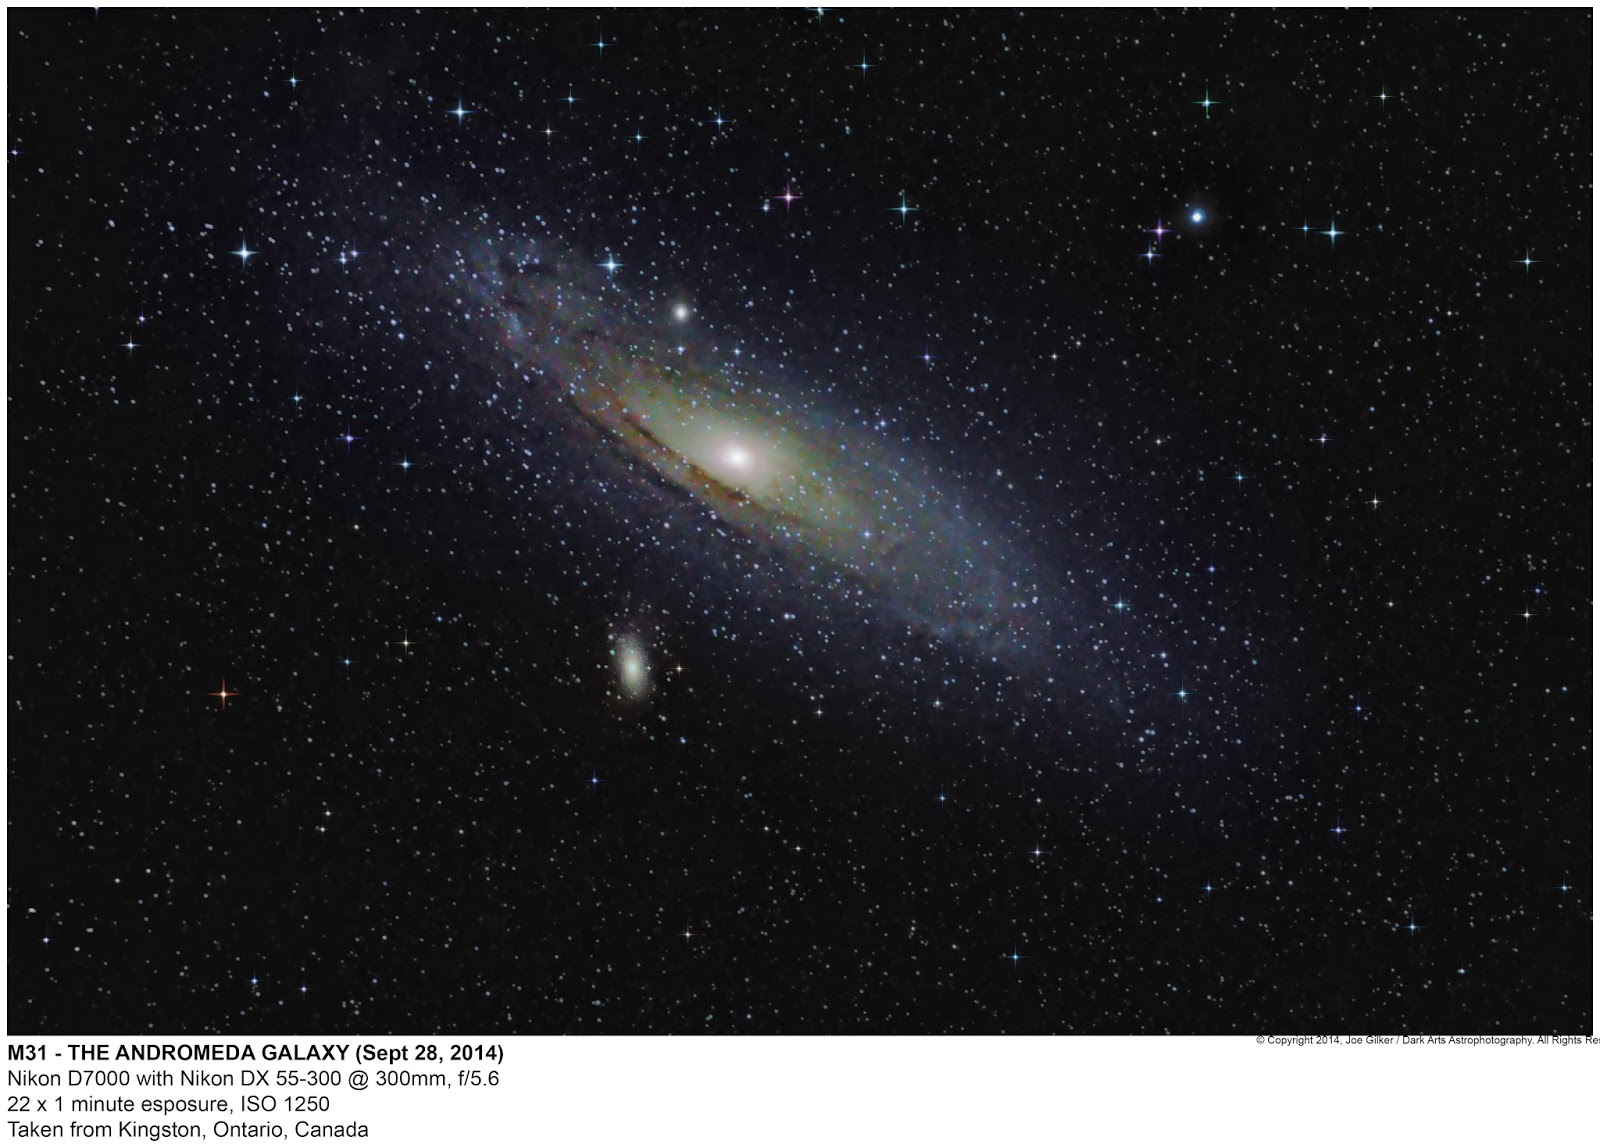
Flickr link: https://www.flickr.com/photos/crunchmeister/15205117549/

And these tracking options aren’t just for beginners. They may be inexpensive compared to larger, motorized or computerized mounts, but they’re very good tools for photographers of all levels. Their small size and weight make them ideal for throwing into a backpack with your other gear to trek to remote locations where transporting a telescope and mount would be impractical or impossible.

So with these tracking options, it’s quite possible to put together a very functional astrophotography rig for $1000 or less. Used, last generation DSLR bodies are routinely found on ebay for a couple of hundred dollars. Some will even come with a basic 18-55 lens making them suitable for wide field photography. These are still quality camera, but have been supplanted by newer models with higher pixel counts and more features. a Nikon or Canon zoom lens that extends to 300 mm can readily be found new for $350 or less. You can find them used for even less. Again, they’re routinely found on ebay for less than $200.

So with all the options out there, there’s really no reason for someone who wants to try their hand at astrophotography to think they need to spend really big bucks on high tech equipment. Chances are, if you enjoy it, you will eventually upgrade to better, more expensive gear. But there’s really no reason to spend a small fortune to get started. Our technological advances in the last two decades have made this activity accessible to just about anyone.

So till next time, keep your eyes to the sky. Clear skies!

Striving For Continuous Improvement Instead of Perfection.

Astrophotography is an art form just as regular “terrestrial” photography is. As astrophotographers, we strive to capture the invisible beauty of the skies and make it visible for all to see and admire. And as with any discipline, we strive for what we as individuals see as perfection.

From the time we arrive at our chosen site to the moment we publish our final image, there’s a myriad of steps we need to follow. A failure in any of the steps in this process can lead to undesirable final results. I’ve been there many times, as I’m sure many others have been. I’ve had far more failures than successes, although I am seeing the failure rate decline as I gain experience. There are many factors we can control – gear setup, mount alignment, camera settings, decisions we make in our post processing, etc. And there are as many factors that we’re slaves to, namely weather, seeing conditions, light pollution, etc.

Astrophotography is a multidisciplinary pursuit. It requires a solid foundation in astronomy to know the objects, where to find them, and have a reasonable understanding of celestial mechanics. Without at least a working knowledge of the sky, it makes the rest of this process impossible.

We have to have a good understanding of our equipment, how to set it up and how to use it. As “easy” as it is to set up a computerized go-to scope for visual observation, we have to have the process down to a science for photography. Slight misalignments which are acceptable for visual observation will utterly ruin a photographic session. And this is just a basic set up. When you add CCD astronomy camera, auto-guiders, computer control, etc, it gets even more complicated. It’s surprising you don’t need a degree in Computer Sciences to to this.

We have to have a good basic understanding of meteorology to understand how atmospheric conditions affect our imaging. Knowing how the atmosphere affects our views of the sky is an important aspect. Often, skies that look clear will be terrible for imaging due to turbulence in the upper atmosphere. We have to be aware of these conditions that aren’t always readily apparent.

We have to understand photography and how to effectively use our gear. There’s no auto mode for astrophotography. You have to set your camera to manual mode and know the relationships between your aperture, shutter, ISO, etc. And of course, we have to learn to use our equipment effectively.

And last but not least, we need to understand the software we use to process our images. Photoshop in itself is a hurdle that can have even the most adept amateur astronomers curled up in the fetal position in a corner sobbing like a little girl. I’ve had a professional photographer with years of Photoshop experience try to process one of my astro images and it frustrated him to the point he was ready to throw his computer out the window. It’s not easy!

But in the end, we all strive to get that “perfect shot”.

But what is perfection? And is there really such a thing? And if there is, can it ever truly be attained? And if it could be attained, what then? What would one have left to strive for once this hypothetical “perfection” has been reached? This is a little more philosophical than I normally tend to get in this blog, but it raises interesting points.

In my view, there is no such thing as perfection. And it’s a good thing that there isn’t. What drives the creative spirit is the pursuit of improvement. The drive to exceed what we’ve already done and set a new benchmark for ourselves is the real goal. If we ever were to attain perfection, there really would be nothing left to work towards and it would make our chosen pursuit pointless. We;d hit the end of the road.

Any art form (and life itself) is a learning process. As we progress, we develop new skills. As we add these tools to our repertoire, we start seeing things that we didn’t before. We expand our possibilities. Often, we look back on past experiences with the famous “…if had known then what I know now…” afterthought. We know we could have done better. In many respects, we do have that opportunity as astrophotographers. We tend to hang on to our own data. Many of us go back and reprocess old data to try to improve on it. And really, I would encourage anyone to do that. It’s great practice. And it’s a great way to gauge ones’ progress in Photoshop voodoo skills.

With that in mind, I set out to see what I could do with some old data. Over the past few weeks, I’ve been playing with various old images I’d taken over the last year seeing if I could improve on any of them. Some of them were improvements, but not terribly significant to the point I thought it was worth republishing. Others, I couldn’t really improve substantially and realized I had hit the limit of what I could do with the data I’d collected.

That said, there was one image that had always been my favourite – an image of M42 I shot last November with only my camera and a 300mm lens. Until my recent stunning shot of M31, I had considered this by far to be my best image. I’d played with this image many times over the past 10 months because I knew for a fact there was a lot of data in there that I hadn’t been able to pull out at the time. It wasn’t until I developed my new workflow a couple of weeks back that I saw any real improvement in it from the original. I touched on it in my blog entry from September 2 called The Report Card. In it, I posted the image below comparing the original image I published on Flickr last year with a newly reprocessed version using my new workflow.

Image posted Sept 2 showing improvement to my old image due to my new workflow.

Needless to say, I was very pleased with the result, but not content with it. I know what M42 is supposed to look like. I know there’s a lot of nebulosity around M42 and between it and NGC 1977. A lot of that  data was in my picture. I could see a faint trace of it, but I hadn’t been able to pull it off without blowing out everything else in my image. But I was determined to bring out the Hα detail. So I set about working over the image again. Hα is not easy to capture with a DSLR, particularly with an unmodified Nikon. But I was determined to squeeze out as much of this impossible detail as I could.

Using some layer masking and blending modes (which I how understand thanks to Doug Hubbell’s awesome YouTube channel), I was able to separate this barely visible detail from the main image, convert it to monochrome, and run the “B&W -> Hα False Color Black Space” action from Noel Carboni’s Astronomy Tools action set. That converted my faint, barely visible detail around the fringe of M42 into deep, rich red hues that I was able to blend back into my original image to produce a much truer representation of what M42 should look like. It’s not just just a pinkish / reddish blob in space. It’s a large tapestry of rich hues and colours that fades out from a bright core. And I’m now displaying it as it should look.

Flickr link: https://www.flickr.com/photos/crunchmeister/15126222377/

So is it good? Absolutely. I’m ecstatic about this image. This is what my old image should have looked like had I been adept enough at Photoshop back when I originally processed it. Is it perfect? Not even close. There’s still some faint nebulosity that I could have pulled out, but I think at this stage, it was more about finding the balance between pulling out the maximum amount of faint detail I could and keeping the image as noise-free as possible. Stretching any more would have brought out noise and pixellation that I don’t want. I did manage to bring out a bit more detail than what is seen in this final image, but the resolution of it was poor with terrible contrast. It just didn’t do the image justice. So I made the “artistic” call to dial it back a bit to what you see now – a nice, clean image.

I do believe I’m near the threshold what I can do with the data contained in this image. After all, this is just from a camera with a 300 mm lens on a tracker shooting 30 second exposures. There was no telescope involved here at all. I’m really not able to get the resolution I need to bring out the contrast and fine details in the nebulosity with such a small aperture. That kind of resolution is the realm of a telescope with much better light gathering capability. And you can bet I’ll be training my 8″ SCT with a 0.63x reducer on it as soon as M42 becomes visible in the evening sky. And I look forward to capturing it from the pristine dark sky at the L&A Dark Sky Viewing Area.

So how does this all tie in to the more philosophical opening of this blog entry?

As much as I’m proud of this new version of the image though, it’s not so much the image that’s the crown jewel here. It’s the learning experience. I put in a lot of time and effort to improve my processes, add new skills to my tool set, and built a better understanding of how things are done. By re-working this old image, I’ve put to practice some of these tools and validated new processes. The learning experience that came along with reprocessing this image is the true prize here. It’s  improvement. And that’s what I strive for. Just like my last image of M31 was leaps and bounds over my previous image of it just a week or so earlier, I see my improvement. But more importantly, I know what I did to improve my entire process from start to finish. And now I can use that experience in future imaging sessions to produce even better pictures. They won’t be perfect either, but I wouldn’t expect them to be. The real satisfaction here comes from knowing that I’ve improved and will improve more as time goes by. So now we’ve gone full circle and we’re back to the initial title of this article. “Striving for continuous improvement, instead of perfection.”

Thanks for your time. I hope you found this article informative and entertaining. Please feel free to share it if you enjoyed it. I’d love to expand readership.

Until next time, clear skies and keep your eyes to the sky.

The King’s Daughter’s Jewel

According to Greek mythology, Andromeda was the daughter of King Cepheus and Queen Cassiopeia, rulers of Aethiopia. Cassiopeia bragged about her daughter’s divine beauty being greater than that of the Nedeids, the nymph daughters of the sea god Nereus. Angered by this, Poseidon released Cetus the sea monster to destroy Aethiopia as punishment for Cassiopeia’s boastful ways.

Upon consulting the Oracle, Cepheus was told that the only way to save his kingdom was to chain his naked daughter to a stone along the coast as a sacrifice to Cetus, which he did. Ultimately, Perseus arrived, slew Cetus and then rescued the beautiful maiden, eventually claiming her as his wife.

The mythology behind the constellations is always interesting to read, but of course, we know that it’s nothing but that – mythology. However, there is a grain of truth to the beauty of Andromeda. The beauty is not found in the constellation per se, but with one of the treasures hidden within.

This gem is known as Messier 31 or NCG 224, or better by it’s common name, the Andromeda Galaxy. Outside of smaller dwarf and satellite galaxies, M31 is our nearest cosmic neighbour at a distance of about 2.5 light years away. M31 is a large galaxy believed to be the largest of the Local Group. Latest observations place it as having over 1 trillion stars, double the estimated 500 million of our own galaxy. Furthermore, M31 is moving towards us. It’s estimated that our 2 galaxies will collide in about 3.75 billion years. Over the next few billion years, the gravitational dance of the two galaxies will cause them to merge into a giant elliptical galaxy. Whether humanity will be around to witness this spectacle is unknown, but what a sight that would be in the night sky.

M31 is the only object outside of the Milky Way that’s visible to the naked eye and if you know where to look, it can even be glimpsed from a site with moderate light pollution. Although in reality, all we see of M31 is the bright core. The rest of the galaxy’s vast expanse is far too dim to be seen without the aide of a telescope. If we were able to see M31 unaided in our night sky, it would be a truly remarkable sight, as its angular size would make it 6 times the width and 2 times the height of a full moon, as can be seen in the photoshopped image below. This may look rather unbelievable to see, but that’s exactly what M31 would look like if its disc was bright enough to see with the naked eye.

Uncredited image. If you know who to credit to it, please let me know

Because of this, it’s should come as no surprise that M31 is a favourite target of astronomers and astrophotographers alike. Through a medium sized telescope from a dark site, wisps of the galaxy’s spiral structure and the contrast of its dust lanes can be observed. While I can’t speak from experience (my 8″ Schmidt-Cassegrain scope is the largest I’ve looked through), a large aperture instrument can provide some truly remarkable views of our neighbour. But to truly get a proper view of M31 in full colour, long exposure photography is an absolute must.

M31 is a favourite of most astrophotographers. It’s large size and relatively near distance make it fairly easy to capture with even a simple camera on a tripod. Although easy to capture, capturing it WELL is a totally different story. And the capture is only half the battle. Even with pristine data, it takes some skill and technique to pull details out of the image. And I’ve been struggling with that for the past year.

I’ve had many attempts at M31 in the last year. While it’s my most often repeated object on my Flickr page, it’s also the one that’s seen the highest rate of failure. For every image of it I have posted, there are at least 2-3 ultimately failed photo sessions associated. And even with my successes, I never really managed to process the image properly until my last session.

My first successful attempt at M31 was on Nov 19 of last year. I had just purchased my iOptron SkyTracker and decided this would be the first target with my new piece of gear. I headed out to a moderately dark site just out of the city limits, set up my camera with a 55-300mm lens at maximum, set the camera’s intervalometer, and let it rip off a bunch of exposures. Finally, I had success! I was utterly amazed by what came out of Deep Sky Stacker once it finished stacking my image. I was amazed that I could capture this kind of detail with just a camera. But I found myself struggling to really pull out the finer detail and clearly show contrast in the dust lanes. While I’m pleased with the image, my skill level with Photoshop was lacking. I was very pleased with my result, but I knew that I could do much better, and vowed to revisit this object again in the future. I tried again several times over the course of the winter, but somehow never managed to top this initial image, despite using the same equipment at the same location, even with M31 higher in the sky and “easier” to shoot.

Flickr link: https://www.flickr.com/photos/crunchmeister/10968613144/

My next somewhat successful attempt at M31 came on June 28 of this past summer. I was out at the Lenox & Addington Dark Sky Viewing Area. My main targets of the evening had been the Milky Way, M13 and M16. But towards the end of the evening, I realized that M31 had risen above the horizon. So I figured it was a perfect opportunity to snap off some shots of it. I was using my new 120mm f/5 refractor, so I figured it would be a good opportunity to put this scope’s wide angle views to use. Being early summer, the night was quite humid and hazy, so it wasn’t the clearest view, but with the wider aperture and faster focal ratio, I did manage to pull out a lot more detail and contrast I had been unable to in my older image taken with just the camera. The resolution of this image was much higher.

But alas, my inexperience with Photoshop once more proved to be my limitation. I had gotten significantly better at image processing, but I was still lacking the tools and techniques to make the details really jump out as in so many other images of M31 I’d seen. While most considered the photo to be a success, I still found it way too “flat” and lacking contrast. But I could definitely see an improvement, and I was determined to capture good, usable data and learn to process it properly

Flickr link: https://www.flickr.com/photos/crunchmeister/14535700005/

Since then, I’ve been attempting to take photos of M31 whenever the opportunity presented itself. I also practiced a lot with old data, combining data sets, etc. But the results had been mixed at best. Although in the process, I learned a lot about Photoshop and started using more advanced techniques. I knew that once I got some good shots, I’d be able to produce a great final image.

That opportunity came on the evening of September 16. I headed out to a large empty lot in an industrial park just outside the city I’d been taking images from lately. It’s certainly no dark site, but there’s no ambient lighting and since it’s east of the city, light pollution is moderate and quite manageable. There’s really only heavy sky glow in the south and southwestern skies. The eastern sky is quite dark except for right above the horizon.

I decided to try some very different settings than I usually do. I lowered my ISO to 640 and reduced my exposure time to 90 seconds from the 3 minutes I’d been using previously. I wanted to minimize noise from light pollution, star bloating, and chromatic aberration generated by my achromatic refractor. I figured I’d be able to get a much better resolution out of my image that way.

And as it turns out, I was successful! I did a quick stack when I got home, and right away I could see the quality of my images had increased dramatically over previous attempts. A quick stretching in Photoshop showed fine detail that I had never captured before. I couldn’t wait to get this image processed!

The following evening, I finally got the opportunity to sit down and really work on it. Using my new image processing workflow that I’d developed and a few new sharpening techniques I had learned, I got to work. Finally, I got the result that I had been wanting for the past year. The final image didn’t look flat and 2D. I had managed to get the depth that had been lacking in my previous images. I had great, vibrant colour around the core. I managed to bring out nice detail and contrast in the dust lanes. The fine details pop out of the image. And the elusive nebulosity on the edge of the disc show some glorious deep blue details – something that had been sorely lacking in my previous images. And I managed a great colour balance throughout the image and managed to have a nice, neutral off-black background with minimal noise.

Flickr link: https://www.flickr.com/photos/crunchmeister/15085691679/

As pleased as I am with this image, it’s far from perfect. I’m still experiencing star bloating and chromatic aberration (blue halos around bright stars). But that’s the nature of using a larger aperture achromatic refractor with a fast focal ratio. It’s an unavoidable consequence of the nature of those optics. However, I think I managed to mitigate the effects enough with my shorter exposures and lower ISO as to not really detract from the final image. I’m proud to have finally achieved this level of quality in one of my images. Looking at the progression of the above images, I can really see how far I’ve come from my humble beginnings in astrophotography. That said, I’m still very much a novice and there’s always a lot more to learn. But judging by these improvements, I can only imagine where I’ll be another year from now.

On a side note, once I had finished shooting M31, I realized that M33 the Triangulum Galaxy had risen above the horizon. I’d been quite curious about this galaxy. I had never targeted it, either visually or photographically before. I already had all my subs and calibration frames and still had a bit of time before I had to go, so I decided to get it in frame to see how big it would appear to my scope. After a couple of test images to frame the shot properly, I realized this was actually a pretty large object as well. Much bigger than I had anticipated. So I set the intervalometer to grab 30 minutes worth of frames.

The result is mixed. M33 was still very low on the horizon, so sitting in the light pollution glow zone and haze. The atmosphere was quite turbulent and the wind picked up. As a result, about half of my subs had to be thrown out, leaving me with only 15 minutes worth of data. And of the remaining subs, I normally would have thrown them out because of their low quality score in DSS. But since this was really a test on a target of opportunity, I went through the stacking and processing process anyway. I just wanted to get this one out of the way. And this was the result.

Flickr link: https://www.flickr.com/photos/crunchmeister/15086147268/in/photostream/

Overall, the results weren’t too bad! This is an extremely difficult target to process and bring out contrast, especially with poor quality subs. But for what it was, I’m quite happy with the results. The next time I shoot this target, I’ll be using my 8″ LX90 with a 0.63 reducer. That should give me much better resolution and higher contrast. I can also do much longer subs without having to be concerned about start bloating and chromatic aberration. I’ll be heading out to the Dark Sky Viewing Area on Friday evening. I’ll have to try to get at least 30 minutes on M33 to see how I can improve the data I already have.

Until next time, clear skies and keep your eyes to the sky.

Curtain of Fire

First off, for those that don’t know, I’ll give a brief explanation of what the aurora borealis is in layman’s terms. The sun will occasionally discharge large clouds of plasma in the form of a solar flare. Occasionally, the Earth intersects the path of these flares and collides. When this occurs, the plasma is swept up by our planet’s magnetosphere. The charged particles of plasma get directed to the north and south poles. When they collide with the atmosphere, they glow and can be seen as aurora. Intensity of auroras can vary on many factors, but the main contributor is the size of the flare that hits us.

On September 10, 2014, the sun unleashed an X1.6 solar flare in our direction. The chance of a massive geomagnetic storm got aurora watchers in a frenzy. It was all over the news, and the event got very high coverage. It promised to be an impressive show for millions of people in North America, even stretching down to parts of the United States where the auroras are rarely seen. Unfortunately for me, according to the maps released, I was in a “poor” zone where the aurora would be minimal. But I was still intent on seeing it and more importantly, getting my first ever images of it.I originally grew up in a small mining town on the sub-arctic tunrda of northern Quebec. I was born there and lived there until I was in my mid teens. The aurora was a pretty regular event. On many clear nights through the year, you could look up and see at least a light display. Even in partial cloud cover, we could still see the bands of green dancing across the sky. Occasionally, there would be intense displays where we could see all forms of colour waving over the northern sky. So seeing an aurora is nothing new for me. Well, sort of…

At the time, this was normal for me. Growing up, my interest in the sky was minimal. I took the aurora for granted. I had no way of knowing that the opportunity to see such dazzling light shows was NOT the norm everywhere. It was the status quo for me, because it was all I knew. And having dark skies was also the norm. The town I lived in was quite small and isolated. Other than ambient lighting, there was very little in terms of light pollution. If only I could have regular access to skies like that now!

In my teens, my family moved to a small country town in eastern Quebec where light pollution was also very minimal. Being much farther south, the aurora was far less frequent. This is where I came to the realization that regular auroral shows were not the norm everywhere. I was still under dark skies all the time though. But wasn’t into astronomy or photography at the time, so didn’t appreciate the “gift” I had.Fast forward 30 years and I now live in a medium size city in eastern Ontario. I have to contend with light pollution. Although I’m luckier than most urban amateur astronomers. Our light pollution here isn’t terrible compared to most cities. I also live in a suburb on the northern perimeter, so I only have bad sky glow due south. And I have a couple of spots just out of the city that I can quickly get to within a 10 minute drive that will give me reasonable darkness. But if I want a truly dark sky, I need to drive about 45 minutes north to the Lennox & Addington Dark Sky Viewing Area.And this is where I was on Friday, Sept 12, waiting for the aurora and my first chance to capture images of it. Usually, this site is quiet. I’ve been there several times over the course of the summer. At most, I think I’ve see perhaps a dozen people there at one time, and maybe 30-ish people would show up and leave over the course of the evening. My rough estimate for Friday was well over 100 people showed up, with my rough head count estimate of perhaps 40 people there at any given time.

Many people came from the Toronto area (a 2+ hour drive) to see the aurora. Some people came from as far as Hamilton (a 3 hour drive). However, most left disappointed. Turns out the Toronto-area news told everyone the aurora would be visible between midnight and 3 AM. So many people showed up between 11 and midnight. Unfortunately for the them, the aurora made its appearance at about 9 PM and was visible for all of 10 minutes or so. And clouds rolled in shortly thereafter and then the moon rose. Of everyone that showed up, I think only 2 people managed to get any images of it at all. And I was one of those! I knew better, so I was there before sunset. I had my camera set up on a tripod and had my scope set up hoping to do some deep sky imaging if the aurora didn’t make a show. I was prepared.

When the aurora finally did show, most of the people there didn’t even realize it. It started as a green glow on the northern horizon. I pointed it out to people, and heard some saying that it wasn’t the aurora, but light pollution. Being mostly city dwellers, they didn’t realize that the northern horizon at this site is pristine dark sky. North of this site is nothing but wilderness and a few scattered small towns for hundreds of kilometers. This was most definitely the aurora. It’s only when hints of purple and blue started showing up higher above the horizon that people really clued in and realized what they were seeing. It’s too bad that it only lasted 10 minutes, because it really was a beautiful show, even though it wasn’t very intense. I was grateful to finally see an aurora after so many years of not seeing one.

The evening was not without its problems though. I missed the peak of the display due to camera focusing issues. I had the camera trained on Arcturus trying to get my focus, and for some reason, I couldn’t. I had clicked the lens to manual mode before attaching it to my camera, but it appears that when I put it on, I hit the switch knocking it back to auto mode. So I was fighting the auto focus without realizing it. While I was doing this, the aurora was at its peak. When I finally realized what happened, fixed, got trained on the aurora and started shooting, it was already receeding. I managed to get 5 pictures before it faded away completely. Of those 5, only 1 had decent detail. And I share that image with you now.

Flickr: https://www.flickr.com/photos/crunchmeister/15234648331/in/photostream/

Once the aurora display died down, I tried to get some deep sky imaging. I wanted to get a good shot of the Ring Nebula with my now working 8″ SCT instead of the 120mm refractor I’ve been using all summer. I wanted to finally put my little light bucket to work. After finding my target and taking some time to frame it properly with test shots, the clouds decided to make an appearance, and I wasn’t able to take any images at all. However, I did manage to take 1 nice test shot of my subject. I’m quite pleased with the results considering it’s a single 30 second sub without any calibration frames. It just goes to show how good imaging can be from a dark site!

M57 – The Ring Nebula. Single 30 second exposure, no calibration frames.

So with too many clouds and a bright moon in the sky, I decided that I would try something I hadn’t attempted before – time lapse photography. I had a bit of an idea how it worked, but had never attempted it. So I figured it would be fun to try out. I popped on my 35mm f/1.8 prime lens and targeted the moon. I figured it would be a nice backdrop for time lapse. While testing out settings, I snapped this pic I entitled “Daylight at Midnight”. It was shot as 12:03, but with my aperture fully open, the resulting image was so bright it looked like it could have been taken mid-day instead! It even came complete with a lens flare. It wasn’t my intention, but I thought the image looked rather cool nonetheless, so I kept it.

Daylight at Midnight: https://www.flickr.com/photos/crunchmeister/15040298640/in/photostream/

So after finding some good settings, I set the intervalometer and let the camera do its thing over the next couple of hours and pointing at different areas. The resulting time lapse isn’t fantastic by any means, but considering this was my first attempt, I’m pretty pleased with the result. It was fun to try out, and I’ll definitely be trying this more in the future. The video can be seen here on YouTube.

So until next time, clear skies to all.

The Report Card

When I started this blog last year, it was intended to document my progress in astrophotography from starting out as a total newbie with no clue about anything. I’ve only been doing astrophotography for a little over year now, and when I started, I knew nothing about photography or Photoshop. I learned everything I know on the subject today through watching video tutorials (YouTube is an amazing resource), trial and error, and comments and advice given by others. It’s been quite an amazing journey of learning, and I doubt it will end any time soon.
So far, my blog entries have been about anecdotal chronicle of some of my photo sessions mixed with random informative posts and reviews. My progress as an astrophotographer can be seen though the work I’ve posted here since I started this blog, but by no means is it really the main focus of the blog as a whole. Today I change that with this post. It was time to analyze my skills and gauge my progress over the past year. But before I get to that, an explanation of how it happened is required.
This past weekend, I spent a lot of time on watching a bunch of processing tutorials learning new tools and techniques to add the the basic set I already had been using. I applied them to some ongoing projects I had (M31 and M51), and my results seemed to be a drastic improvement over previous attempts at this difficult data, as well as my previous images of those same objects. While processing these images, I developed a new workflow using these new tools and techniques I’d learned, documented the process (finally – I can’t stress enough how this part was helpful), and followed this guide to the letter. And the end result was very impressive.

https://www.flickr.com/photos/crunchmeister/14914674560/in/photostream/

https://www.flickr.com/photos/crunchmeister/15078823916/

Given that, I thought I would go back and revisit some old data to see what I could do with it. To date, my favourite image has been my pic of the Orion and Running Man nebulae I shot last November. So I figured I’d go dig up that data set to see what I could do with it now that I had a better understanding of Photoshop and had new skills under by belt.

This is the result of processing my old data with my new and improved workflow. I was able to have a much nicer, neutral brackground vs the pitch black (although it could be a touch darker), and was able to pull much better detail and contrast out of the nebulae. I’m sure I could have even have pulled out more faint detail, but decided I was happy with what I had for the time being. I’ll likely be adding more data to this one M42 is visible in the coming months anyway, so I’ll hold off till then. But for the time being, I’m very pleased with what I’ve accomplished with this new image.

Click to see full size version

That said, I see some processing errors that need to be corrected in the next version. I’m still learning to use some of the new tools I’ve added to my skillset. I’ve just started using manual noise reduction (using Noise Ninja) and using sharpening (never used it before). It’s going to take some practice to be able to come to grips with those processes as well as others I’ve added.In the coming days, I intend to revisit some data I took of M31 last year using only my camera (as with this last image) to see what I can do with this old data and how I can improve it with my new workflow. It should be interesting to see what I can do with it.
So overall, I think it’s fair to say that I’ve made great strides in the last year. And I honestly have to thank my friends over at the Amateur Astrophotography Magazine, Astronomy for Fun, and Astrophotography/ Amateur Astronomy Enthusiasts Facebook groups (all linked below). These groups are full of really informative people. I’ve learned a lot from people there directly and indirectly through their informative posts, one on one help, or just seeing other peoples’ work to give me a goal to aspire to. If you’re not a member, you should check them out.

Amateur Astrophotography Magazinehttps://www.facebook.com/groups/AmateurAstrophotography/

Astronomy for Funhttps://www.facebook.com/groups/astroforfun/

Amateur Astronomy Enthusiasts Facebook groups – https://www.facebook.com/groups/astrophotographers/

And of course, the various YouTube videos, blogs and other posts I’ve read and watched have been invaluable to get me where I am. It’s just mind blowing how much good information there is out there for those willing to seek them it out.
In the next while, I’ll try to make another blog post including links to some of the blogs, sites and videos that I found useful, as well as some of the tools I’ve been using.
So until next time, friends, clear skies.