According to Greek mythology, Andromeda was the daughter of King Cepheus and Queen Cassiopeia, rulers of Aethiopia. Cassiopeia bragged about her daughter’s divine beauty being greater than that of the Nedeids, the nymph daughters of the sea god Nereus. Angered by this, Poseidon released Cetus the sea monster to destroy Aethiopia as punishment for Cassiopeia’s boastful ways.
Upon consulting the Oracle, Cepheus was told that the only way to save his kingdom was to chain his naked daughter to a stone along the coast as a sacrifice to Cetus, which he did. Ultimately, Perseus arrived, slew Cetus and then rescued the beautiful maiden, eventually claiming her as his wife.
The mythology behind the constellations is always interesting to read, but of course, we know that it’s nothing but that – mythology. However, there is a grain of truth to the beauty of Andromeda. The beauty is not found in the constellation per se, but with one of the treasures hidden within.
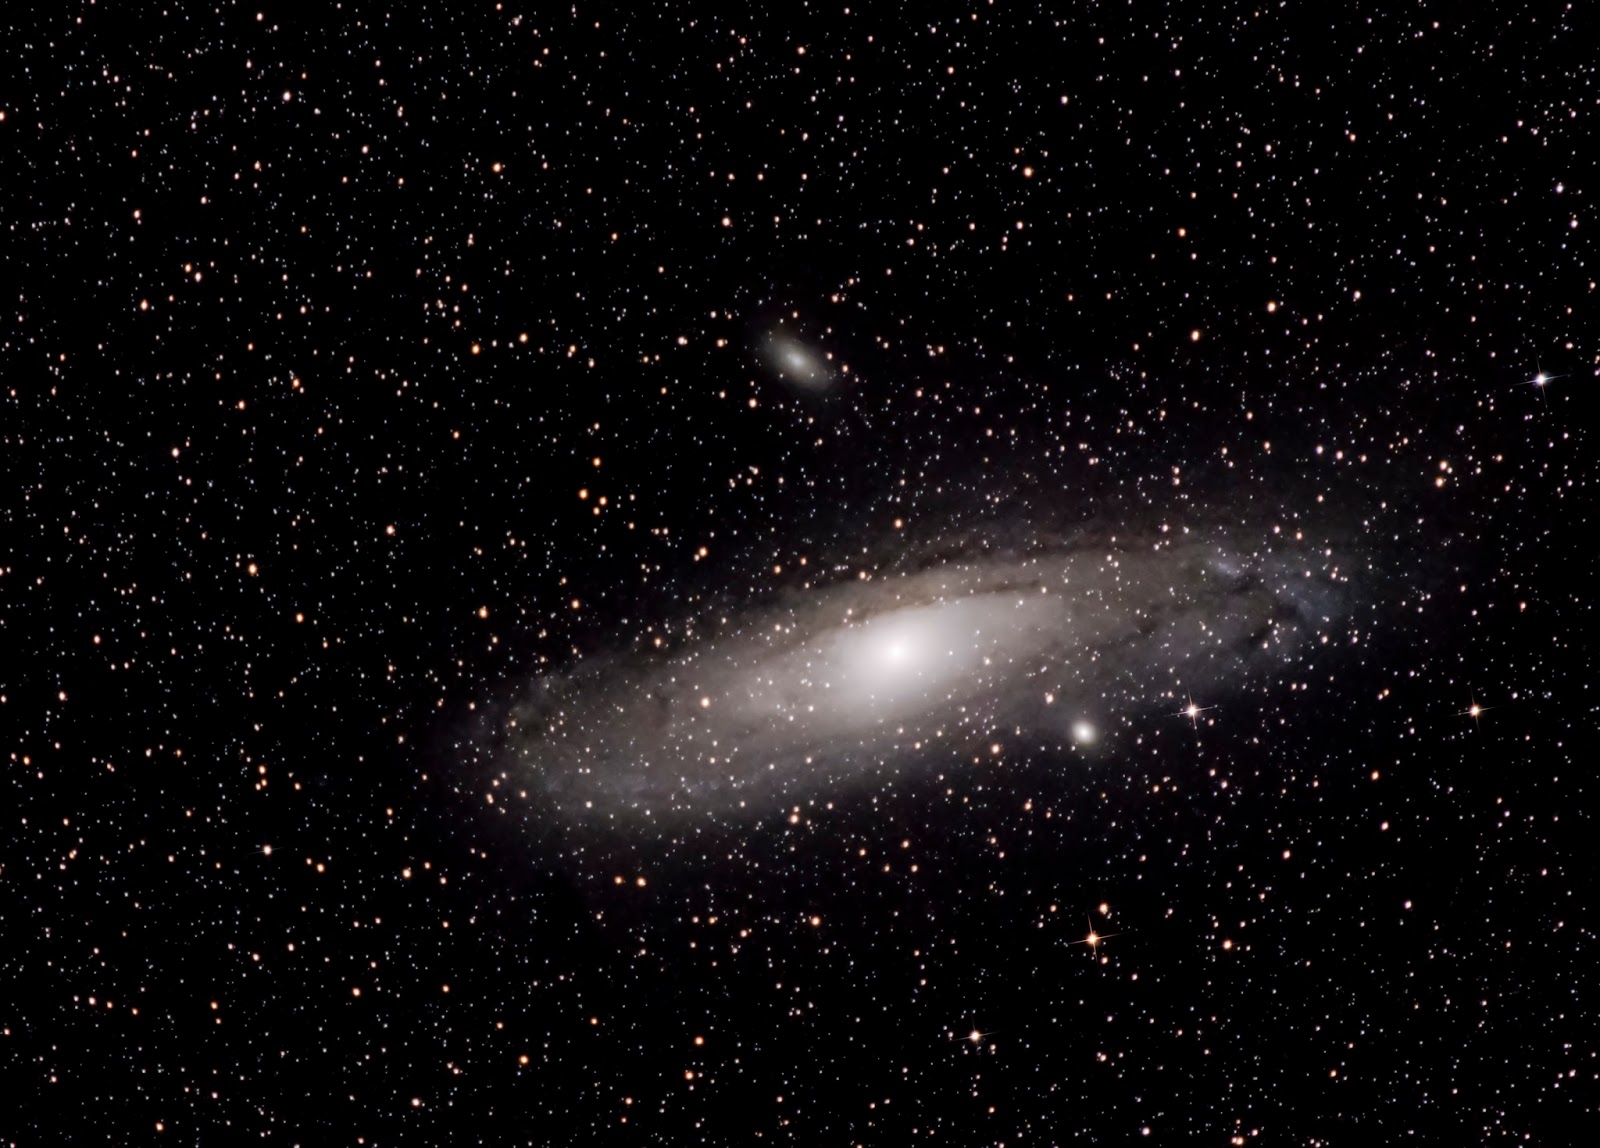
This gem is known as Messier 31 or NCG 224, or better by it’s common name, the Andromeda Galaxy. Outside of smaller dwarf and satellite galaxies, M31 is our nearest cosmic neighbour at a distance of about 2.5 light years away. M31 is a large galaxy believed to be the largest of the Local Group. Latest observations place it as having over 1 trillion stars, double the estimated 500 million of our own galaxy. Furthermore, M31 is moving towards us. It’s estimated that our 2 galaxies will collide in about 3.75 billion years. Over the next few billion years, the gravitational dance of the two galaxies will cause them to merge into a giant elliptical galaxy. Whether humanity will be around to witness this spectacle is unknown, but what a sight that would be in the night sky.
M31 is the only object outside of the Milky Way that’s visible to the naked eye and if you know where to look, it can even be glimpsed from a site with moderate light pollution. Although in reality, all we see of M31 is the bright core. The rest of the galaxy’s vast expanse is far too dim to be seen without the aide of a telescope. If we were able to see M31 unaided in our night sky, it would be a truly remarkable sight, as its angular size would make it 6 times the width and 2 times the height of a full moon, as can be seen in the photoshopped image below. This may look rather unbelievable to see, but that’s exactly what M31 would look like if its disc was bright enough to see with the naked eye.
 |
| Uncredited image. If you know who to credit to it, please let me know |
Because of this, it’s should come as no surprise that M31 is a favourite target of astronomers and astrophotographers alike. Through a medium sized telescope from a dark site, wisps of the galaxy’s spiral structure and the contrast of its dust lanes can be observed. While I can’t speak from experience (my 8″ Schmidt-Cassegrain scope is the largest I’ve looked through), a large aperture instrument can provide some truly remarkable views of our neighbour. But to truly get a proper view of M31 in full colour, long exposure photography is an absolute must.
M31 is a favourite of most astrophotographers. It’s large size and relatively near distance make it fairly easy to capture with even a simple camera on a tripod. Although easy to capture, capturing it WELL is a totally different story. And the capture is only half the battle. Even with pristine data, it takes some skill and technique to pull details out of the image. And I’ve been struggling with that for the past year.
I’ve had many attempts at M31 in the last year. While it’s my most often repeated object on my Flickr page, it’s also the one that’s seen the highest rate of failure. For every image of it I have posted, there are at least 2-3 ultimately failed photo sessions associated. And even with my successes, I never really managed to process the image properly until my last session.
My first successful attempt at M31 was on Nov 19 of last year. I had just purchased my iOptron SkyTracker and decided this would be the first target with my new piece of gear. I headed out to a moderately dark site just out of the city limits, set up my camera with a 55-300mm lens at maximum, set the camera’s intervalometer, and let it rip off a bunch of exposures. Finally, I had success! I was utterly amazed by what came out of Deep Sky Stacker once it finished stacking my image. I was amazed that I could capture this kind of detail with just a camera. But I found myself struggling to really pull out the finer detail and clearly show contrast in the dust lanes. While I’m pleased with the image, my skill level with Photoshop was lacking. I was very pleased with my result, but I knew that I could do much better, and vowed to revisit this object again in the future. I tried again several times over the course of the winter, but somehow never managed to top this initial image, despite using the same equipment at the same location, even with M31 higher in the sky and “easier” to shoot.
 |
| Flickr link: https://www.flickr.com/photos/crunchmeister/10968613144/ |
My next somewhat successful attempt at M31 came on June 28 of this past summer. I was out at the Lenox & Addington Dark Sky Viewing Area. My main targets of the evening had been the Milky Way, M13 and M16. But towards the end of the evening, I realized that M31 had risen above the horizon. So I figured it was a perfect opportunity to snap off some shots of it. I was using my new 120mm f/5 refractor, so I figured it would be a good opportunity to put this scope’s wide angle views to use. Being early summer, the night was quite humid and hazy, so it wasn’t the clearest view, but with the wider aperture and faster focal ratio, I did manage to pull out a lot more detail and contrast I had been unable to in my older image taken with just the camera. The resolution of this image was much higher.
But alas, my inexperience with Photoshop once more proved to be my limitation. I had gotten significantly better at image processing, but I was still lacking the tools and techniques to make the details really jump out as in so many other images of M31 I’d seen. While most considered the photo to be a success, I still found it way too “flat” and lacking contrast. But I could definitely see an improvement, and I was determined to capture good, usable data and learn to process it properly
 |
| Flickr link: https://www.flickr.com/photos/crunchmeister/14535700005/ |
Since then, I’ve been attempting to take photos of M31 whenever the opportunity presented itself. I also practiced a lot with old data, combining data sets, etc. But the results had been mixed at best. Although in the process, I learned a lot about Photoshop and started using more advanced techniques. I knew that once I got some good shots, I’d be able to produce a great final image.
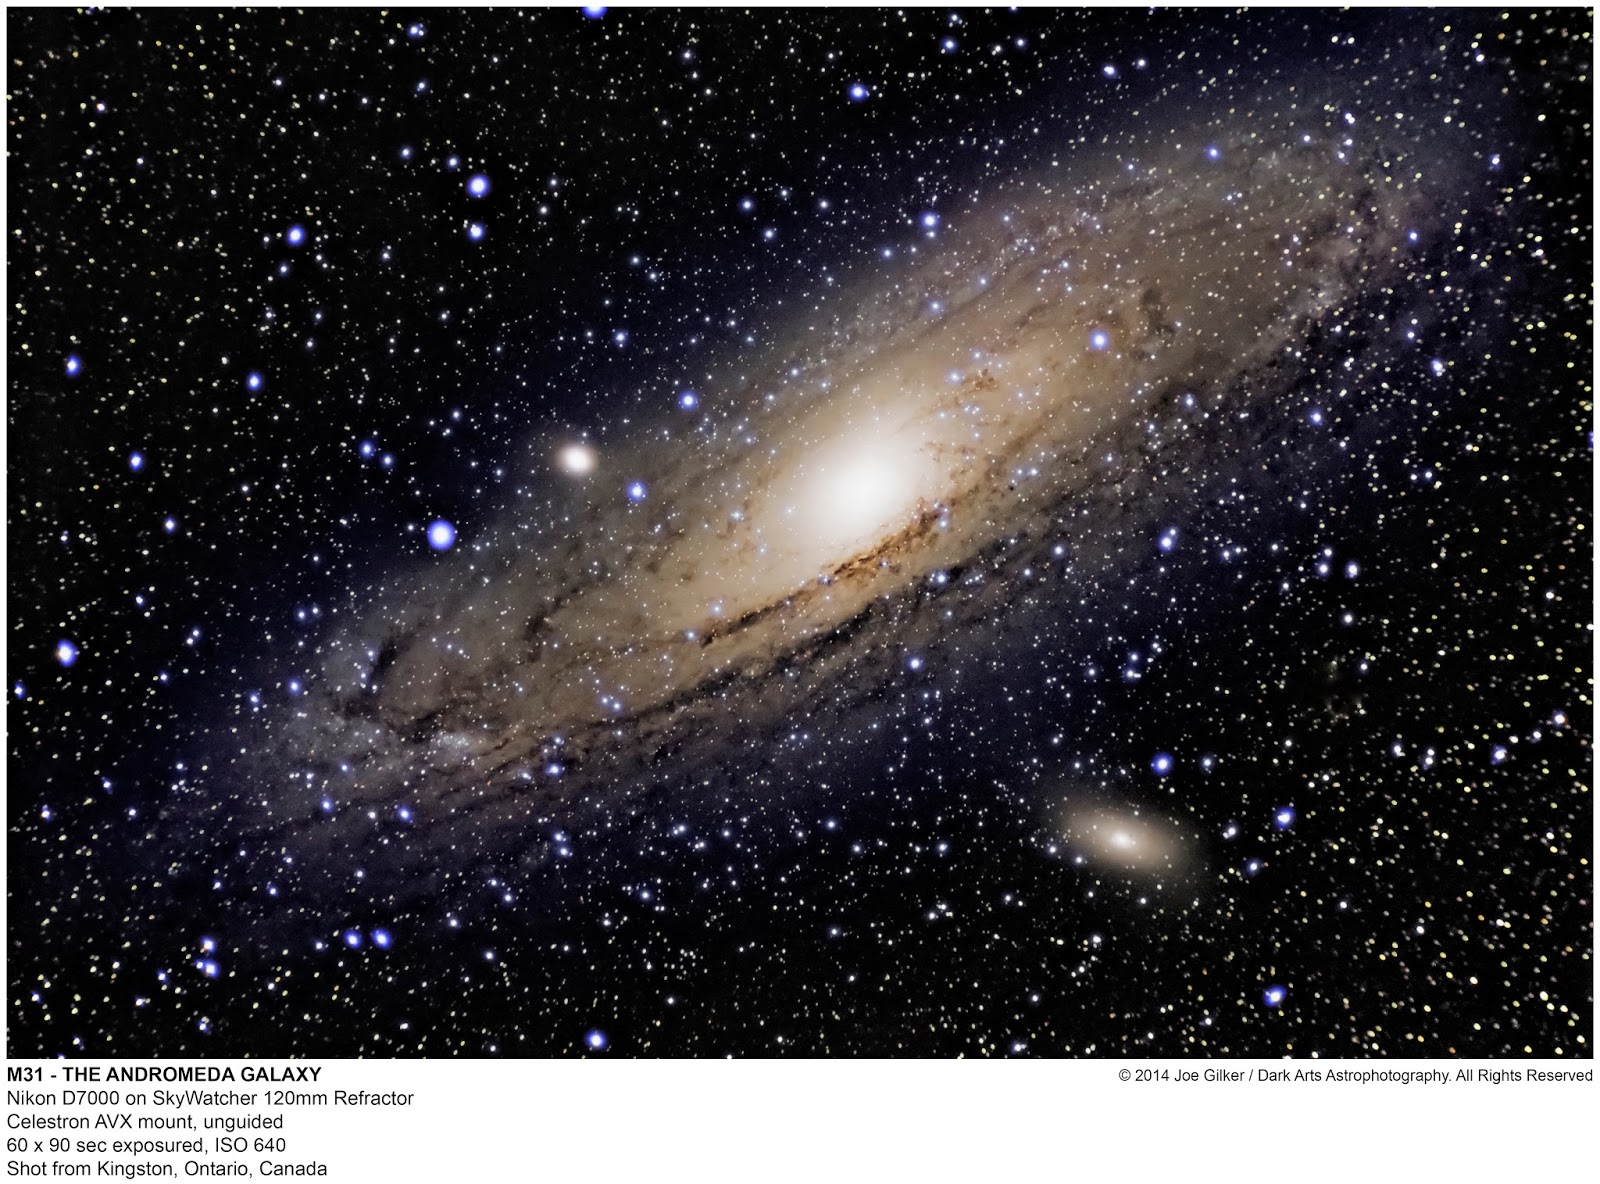
That opportunity came on the evening of September 16. I headed out to a large empty lot in an industrial park just outside the city I’d been taking images from lately. It’s certainly no dark site, but there’s no ambient lighting and since it’s east of the city, light pollution is moderate and quite manageable. There’s really only heavy sky glow in the south and southwestern skies. The eastern sky is quite dark except for right above the horizon.
I decided to try some very different settings than I usually do. I lowered my ISO to 640 and reduced my exposure time to 90 seconds from the 3 minutes I’d been using previously. I wanted to minimize noise from light pollution, star bloating, and chromatic aberration generated by my achromatic refractor. I figured I’d be able to get a much better resolution out of my image that way.
And as it turns out, I was successful! I did a quick stack when I got home, and right away I could see the quality of my images had increased dramatically over previous attempts. A quick stretching in Photoshop showed fine detail that I had never captured before. I couldn’t wait to get this image processed!
The following evening, I finally got the opportunity to sit down and really work on it. Using my new image processing workflow that I’d developed and a few new sharpening techniques I had learned, I got to work. Finally, I got the result that I had been wanting for the past year. The final image didn’t look flat and 2D. I had managed to get the depth that had been lacking in my previous images. I had great, vibrant colour around the core. I managed to bring out nice detail and contrast in the dust lanes. The fine details pop out of the image. And the elusive nebulosity on the edge of the disc show some glorious deep blue details – something that had been sorely lacking in my previous images. And I managed a great colour balance throughout the image and managed to have a nice, neutral off-black background with minimal noise.
 |
| Flickr link: https://www.flickr.com/photos/crunchmeister/15085691679/ |
As pleased as I am with this image, it’s far from perfect. I’m still experiencing star bloating and chromatic aberration (blue halos around bright stars). But that’s the nature of using a larger aperture achromatic refractor with a fast focal ratio. It’s an unavoidable consequence of the nature of those optics. However, I think I managed to mitigate the effects enough with my shorter exposures and lower ISO as to not really detract from the final image. I’m proud to have finally achieved this level of quality in one of my images. Looking at the progression of the above images, I can really see how far I’ve come from my humble beginnings in astrophotography. That said, I’m still very much a novice and there’s always a lot more to learn. But judging by these improvements, I can only imagine where I’ll be another year from now.
On a side note, once I had finished shooting M31, I realized that M33 the Triangulum Galaxy had risen above the horizon. I’d been quite curious about this galaxy. I had never targeted it, either visually or photographically before. I already had all my subs and calibration frames and still had a bit of time before I had to go, so I decided to get it in frame to see how big it would appear to my scope. After a couple of test images to frame the shot properly, I realized this was actually a pretty large object as well. Much bigger than I had anticipated. So I set the intervalometer to grab 30 minutes worth of frames.
The result is mixed. M33 was still very low on the horizon, so sitting in the light pollution glow zone and haze. The atmosphere was quite turbulent and the wind picked up. As a result, about half of my subs had to be thrown out, leaving me with only 15 minutes worth of data. And of the remaining subs, I normally would have thrown them out because of their low quality score in DSS. But since this was really a test on a target of opportunity, I went through the stacking and processing process anyway. I just wanted to get this one out of the way. And this was the result.
 |
| Flickr link: https://www.flickr.com/photos/crunchmeister/15086147268/in/photostream/ |
Overall, the results weren’t too bad! This is an extremely difficult target to process and bring out contrast, especially with poor quality subs. But for what it was, I’m quite happy with the results. The next time I shoot this target, I’ll be using my 8″ LX90 with a 0.63 reducer. That should give me much better resolution and higher contrast. I can also do much longer subs without having to be concerned about start bloating and chromatic aberration. I’ll be heading out to the Dark Sky Viewing Area on Friday evening. I’ll have to try to get at least 30 minutes on M33 to see how I can improve the data I already have.
Until next time, clear skies and keep your eyes to the sky.
1publicity
gay phone chat https://bjsgaychatroom.info/
bareback gay men dating https://gaypridee.com/
ladybug chat noir gay https://gaytgpost.com/
gay roulette chat https://gay-buddies.com/
gay dating site https://speedgaydate.com/
free aristocrat slots https://2-free-slots.com/
free slots online games https://freeonlneslotmachine.com/
las vegas casino slots https://candylandslotmachine.com/
liberty slots instant play https://pennyslotmachines.org/
vegas free slots https://slotmachinesworld.com/
slots free https://slotmachinesforum.net/
play free slots online https://slot-machine-sale.com/
dancing drums free slots https://beat-slot-machines.com/
omg fortune free slots https://411slotmachine.com/
m.2 optane memory slots https://www-slotmachines.com/
dissertation writing guide https://dissertationwriting-service.com/