Month: December 2013

The Hunter Becomes the Hunted

With winter being in full throes (despite the fact it hasn’t “officially” started yet), one signpost constellation is Orion  the Hunter, which magesitcally covers a rather wide area of the southern sky.This constellation is full of lore and myth from different cultures. But that aside, it’s a wonderful image on the tapestry of the night sky through the winter. And it’s the target of many amateur astronomers and astrophotographers due to its myriad of nebulae contained therein.

I’m really not able to find a definitive answer as to how many nebulae it contains. Figures tend to range from 10-20, depending on who you ask. Either way, there’s no shortage of stuff to see. The Great Orion Nebula, the Running Man Nebula, the Flame Nebula, The Horsehead Nebula, and Barnard’s Loop are among some of the wonderful sights that can be seen and photographed. It’s a cornucopia of targets for those willing to search them out and patient enough to find and perhaps image them.

Through the winter, I’ll be making several of the well-known objects in Orion my target. I’ve already started with the Orion and Running Man Nebulae, as well at the Flame and Horsehead. Both have been featured here in previous installments of my blog. All are simply 1 hour’s worth of 30 second exposures at this point. I’ll be adding more data to those over the coming months.

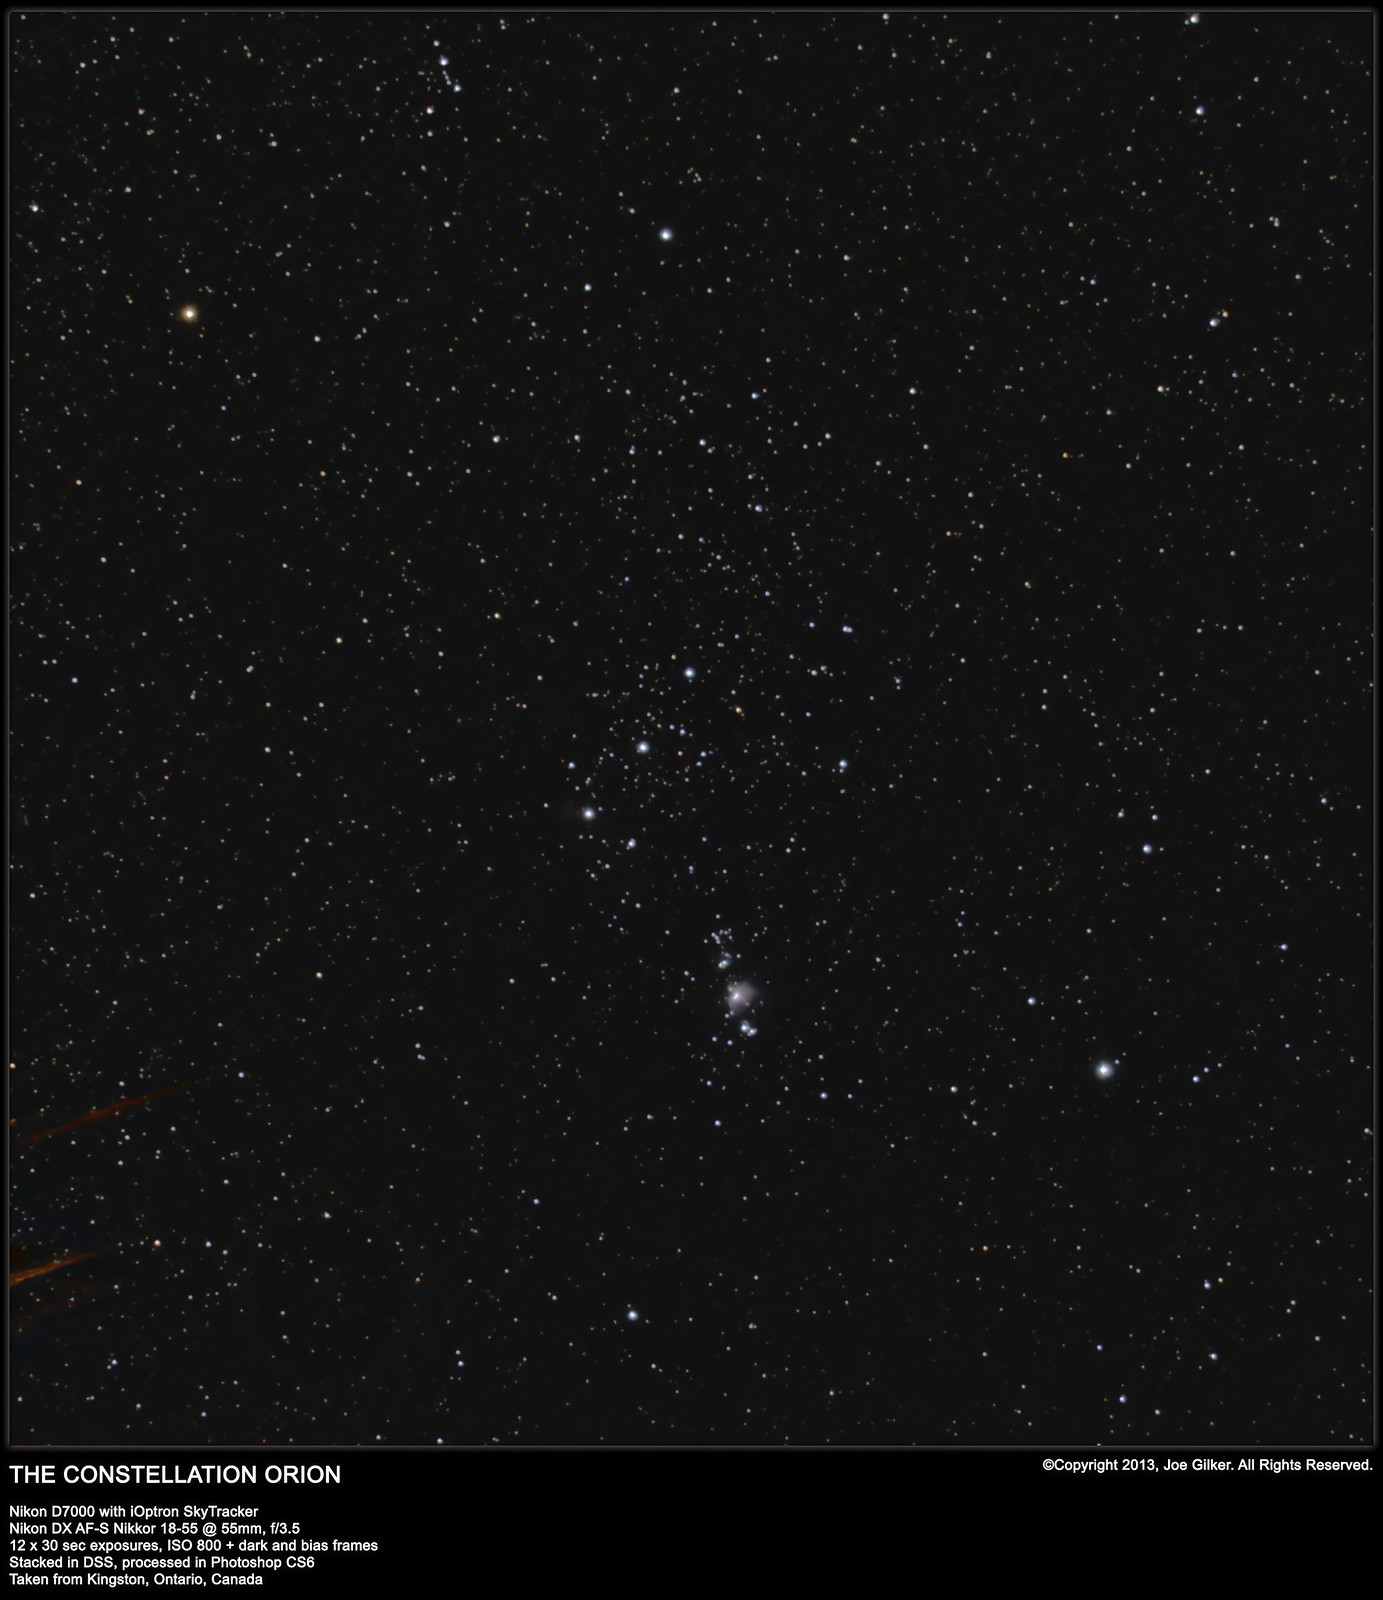
But on a very cold evening a few nights ago, I stepped out with my camera and SkyTracker. The seeing was about 3/5 with a 60% moon in the western sky. I decided that photographing the deep sky objects wasn’t going to bear great fruit, so I figured I would try to catch the entire constellation in one image. I popped on my 18-55mm lens, aligned my mount, and fired off a bunch of 30-second subs, darks and bias frames.

The resulting subs didn’t look like much.  Once stacked, the light pollution and gradient in the background made me think that this would be a lost cause, can be seen by this image. The trees in the foreground weren’t a big issue, as I planned on cropping the image anyway.

Orion, the Hunter
One of the subs (light frames) that was stacked for the final image below.
Jupiter is visible in the upper left corner.

Then it came to processing the image. I was able to remove the gradient and get a nice neutral, dark background. It actually turned out much better than I had anticipated.  Betelgeuse shone magnificently. M42, the Orion Nebula was clearly visible, and I even managed to get a faint hint of the Flame Nebula. Overall, I’m very pleased with the results of this session.

http://www.flickr.com/photos/crunchmeister/11333572226/in/photostream/

Clear skies.

The Horse(head) Whisperer

It was a chilly night. -6ºC / 21ºF. It doesn’t sound like much, but standing out in the cold, you feel the chill quickly. But it was the first clear night in 2 weeks, and the 3rd in over a month. I was really looking forward to photographing my latest target – The Horsehead Nebula.

I’d tried the Horsehead 10 days back when I was giving my new SkyTracker it’s test drive from a semi-dark site just out of town. That night, I got fantastic views of the Pleiades and the Orion Nebula. I’d left the Flame and Horsehead nebulae as my last targets for the evening. The first 2 targets went great. Alas, after I after a few shots, I stepped out of my warm car to check out my on my focus and alighnment. All was great. But apparently, I must have bumped my tripod out of alignment. When I checked again about 40 shots later, all I found in my subs were bad star trails. So in all, I only managed to get 13 useable subs.

What I did get wasn’t too bad. I managed to get a semi decent view of the Flame Nebula. But my real target, the elusive Horsehead was just a faint spot in the image – barely visible to the trained eye, and invisible to anyone who doesn’t know where to look for it.


So last night, it was time to get cracking and try to capture this target. I knew I wouldn’t get much with 30 second exposures (which I’m still limited to at the moment as I wait for my remote shutter control / timer to arrive). But with enough subs, I was pretty sure that I could capture it at least enough to make it visible. 

Neither the day or the forecast had looked very promising, but I took a peek outside at about 10PM, and sure enough, the sky was clear with only the occasional thin cloud blowing through. The moon was in the western sky, so that was definitely playing against me. And of course, I was in the city photographing from my driveway. It certainly wasn’t perfect, but it was the best sky I’d seen in weeks, so I had to take advantage of it.

100 minutes, 120 subs, 30 darks and 30 bias frames later, I packed up my gear and headed back inside. I unloaded the contents of my camera onto my computer, loaded it all up into DeepSkyStacker and went to bed due to having work in the morning.

I quickly checked in on my stacked image first thing in the morning. I opened it in Photoshop, did a bit of quick and dirty stretching just to see what I had captured, and sure enough, the Horsehead was visible. Perfect! Coming home for lunch, I processed it properly. The result is what you see below.

The Horsehead is clearly visible. It’s faint and not very detailed, but considering the sky conditions and the fact it was taken with nothing but a camera, I’m pretty pleased with the final result. I’m looking forward to shooting this again over the coming weeks as it rises earlier in the evening. I’ll be able to take longer exposures and hopefully get even more detail out of this beautiful nebula. But for now, I’m pleased.

And here is the result of last night’s outing. Still doesn’t top the previous pic of M42 I took, but considering this is a difficult object to capture properly, I’m very happy.

Murphy’s Law of Astronomy

It’s an unwritten rule of the universe. It’s like the sky wants to spite me. But without failure, every time I get a new telescope or accessory, it’s usually nice and clear in the days leading up to receiving it, and then cloudy for at least a week after receiving it.

It sucks!

Clear skies! (because I don’t have any)

Practicing the dark arts

Since I started doing astrophotography, I’ve been jokingly referring to it as the “dark arts” to my friends and such. Without knowing any better, most would assume I call it such because it involves taking pictures in the dark. That may be true to an extent, but it’s not why I call it that.I call it that because it’s all about bringing light out of the darkness. It’s about making the invisible visible. It’s about exposing what would otherwise be hidden. And to those who don’t know how it works, it may as well be witchcraft. Actually a couple of hundred years ago, this kind of talk would probably have gotten me burned at the stake.

The picture taking process is really just a small part of it. And really, that’s the easy and most “hands off” part of the process. Once the mount is set up, target found, the camera settings are all adjusted and focus is set, the picture-taking process is a pretty brain dead affair. With the proper equipment like a remote intervalometer / shutter control, it’s actually completely automated.

The “dark arts” part comes from processing the photos. First there’s the stacking process with DeepSkyStacker or whatever other stacking software one chooses to use. This produces the master image that then gets edited in Photoshop (or whatever image manipulation software one chooses to use) after the fact. As long as you have good source data from an in-focus camera with accurate star tracking, this is where the black magic really happens.

In the image below, you can see 4 images. The ones on the left are the starting point for editing. The voodoo here is taking that dull, dark image and bringing out the hidden pixels. Yes, all the data seen in the right hand images are in the images on the left. But the details are faint. The images on the right are the result of stretching colours, adjusting contrast, and adjusting colour balances. There are other tricks and tools, of course, but that’s the basic crux of it. No data is added or removed from the original dull image. It’s just a matter of brightening the details while darkening the background. The final results really do look like magic – black magic.

That’s the real reason I refer to it as the “dark arts”. Clear skies.

PRODUCT REVIEW – iOptron SkyTracker

WHAT IS IT?

Nikon D7000 with 55-300mm lens on an iOptron SkyTracker

The iOptron SkyTracker is an equatorial tracking mount for taking long-exposure astrophotography with only a camera and tripod.

When properly aligned to the celestial pole, the unit will automatically track the motion of celestial objects, allowing you to precisely take exposures of up to several minutes with at reasonable magnification levels.

The small, lightweight (2.5 lbs) package travels very easily, making it ideal for bringing on trips or just going out to a remote location where lugging around a big telescope may be inconvenient or impossible. Continue reading “PRODUCT REVIEW – iOptron SkyTracker”

Sweet Success!

The last few days have not been without their challenges in processing my images. As I posted yesterday, I got some really great data on my Friday evening photo session, but have been unable to process the resulting images to any degree of satisfaction.
With some support and advice of some of the great folks over at the Astrophotography / Amateur Astronomy Enthusiasts group on Facebook, I managed to  process two of my images not only to my satisfaction, but well beyond my expectations.
The first was a wide field combination of M42, the Orion Nebula and NGC 1977 The Running Man Nebula. The detail that I managed to pull out here was actually pretty stunning considering this was nothing but a collection of 30 second exposures at ISO 800. I really didn’t expect this much detail. I pulled out as much detail as I could. Of course, the core was a big burned out, as is expected from this nebula. I went and found one of my earlier telescopic imaged of M42 where the core was very detailed and the Trapezium was nice and sharp. I scaled and aligned the image and with layer masking I Photoshop added a nice, sharply detailed core to my image.

I also played around with the HDR process. I create an HDR version of my original image, and layered it on at 50% with screen blending. The highlights and shadows just jumped right out of the screen. I finished up by adding a very subtle false luminosity layer. I took the HDR version, converted the image to an Lab Colour format (LRGB) and pulled out the luminosity layer. I layered that over my final image. That brought out some of the nice highlights and subtle detail that would otherwise have gone unnoticed. And this was the final result.
http://www.flickr.com/photos/crunchmeister/11181614644/in/set-72157637130862065
The next to roll off the line was M45 – The Pleiades Cluster. I’d taken a few images of this cluster before, but my images always turned out rather flat. I’d always taken them from a tripod with the camera without any tracking, so I was limited to 1.6 second exposures when using my 300mm lens to avoid any star trailing. As a result of these short exposures, I got really sharp detail and good noise reduction, but never managed to capture any of the beautiful blue nebulosity in the cluster. The nebulosity really required longer exposures which I really wasn’t equipped to handle at the time.

This time around, I managed to pull out 120 x 30 second exposures. This was enough to bring out a fair amount of the nebulosity. I wanted to collect more data, but with M45 being right overhead, frost was starting to form on my camera lens, so I had to quit. But what I did get in terms of raw data left me quite pleased.

My first attempts at processing this image were very frustrating. No matter what I tried, I was unable to get anything but white or grey results. M45 is famous for it’s blue colour, but try as I might, I was unable to pull out these blue tones. Even trying to insert false colour wasn’t working out for me. But it turns out that being inexperienced with Photoshop, I was going about it the wrong way. Advice given to me by members of the aforementioned Facebook group pointed me in the right direction. As a result, I now know how to adjust the colour balance of my images properly to bring out the natural colours.

And the result of my data:

http://www.flickr.com/photos/crunchmeister/11182359896/in/set-72157637130862065/

Now I still have a new image of M31 I need to process, and as I left for work this morning, I set the Flame Nebula image I took to stack again in DeepSkyStacker. Hopefully I’ll be able to apply the new techniques I leaned yesterday to this image and pull out some more detail out of it. I’ll be trying to process my new M31 data after that.  
 
So all around, I must say that I’m very pleased with how things have gone and very pleased with my progress to date. It seems the dark art of astrophotography is really a multi-disciplinary pursuit. It’s dependent not only on the weather and proper setup of the photographic equipment, but also highly dependent on the Photoshop skills of the person processing the image.
And unlike what people may think about Photoshop in how it’s used in the modelling industry to retouch photos and make models “perfect”, when it comes to astrophotography, we aren’t faking an image or editing it in a way that we’re falsifying the data. Photoshop is used to pull out colours and subtle details that are initially hidden to the eye. No false data is added. This is the true appearance of the object being photographed.
So that all for now. Hopefully my next blog update will be the review of the iOptron SkyTracker I’ve been working on.

Clear skies!

Sometimes I wish I knew what I was doing…

 
So on Friday evening, I was out shooting some images using my new iOptron SkyTracker mount. I had some great success with it, actually. The evening wasn’t without its snags, of course, but overall things went really well.

However, I’ve been having a real challenge when it comes to processing my work. I’ve spent a lot of time this weekend trying to process my images. And I can’t seem to get any colour out of them whatsoever. My “worse” image – the Flame Nebula turns out to be the only one that’s displayed colour in the final results, despite being the one that I have the fewest frames for.

I know there’s something I’m not doing right in my processing. I’m not sure if it’s in DeepSkyStacker or Photoshop. Unfortunately, I’m not experienced enough to actually know WHERE I’m erring in my process. It can be quite frustrating at times. But I’ll keep soldiering on.

Also, coming soon will be a review of the iOptron SkyTracker, as it was requested by a few people already who are curious about it.

Clear skies!