Author: DarkArts_Astro

When The Stars Align

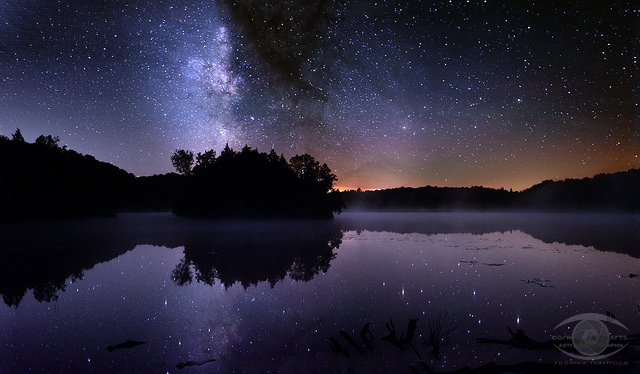
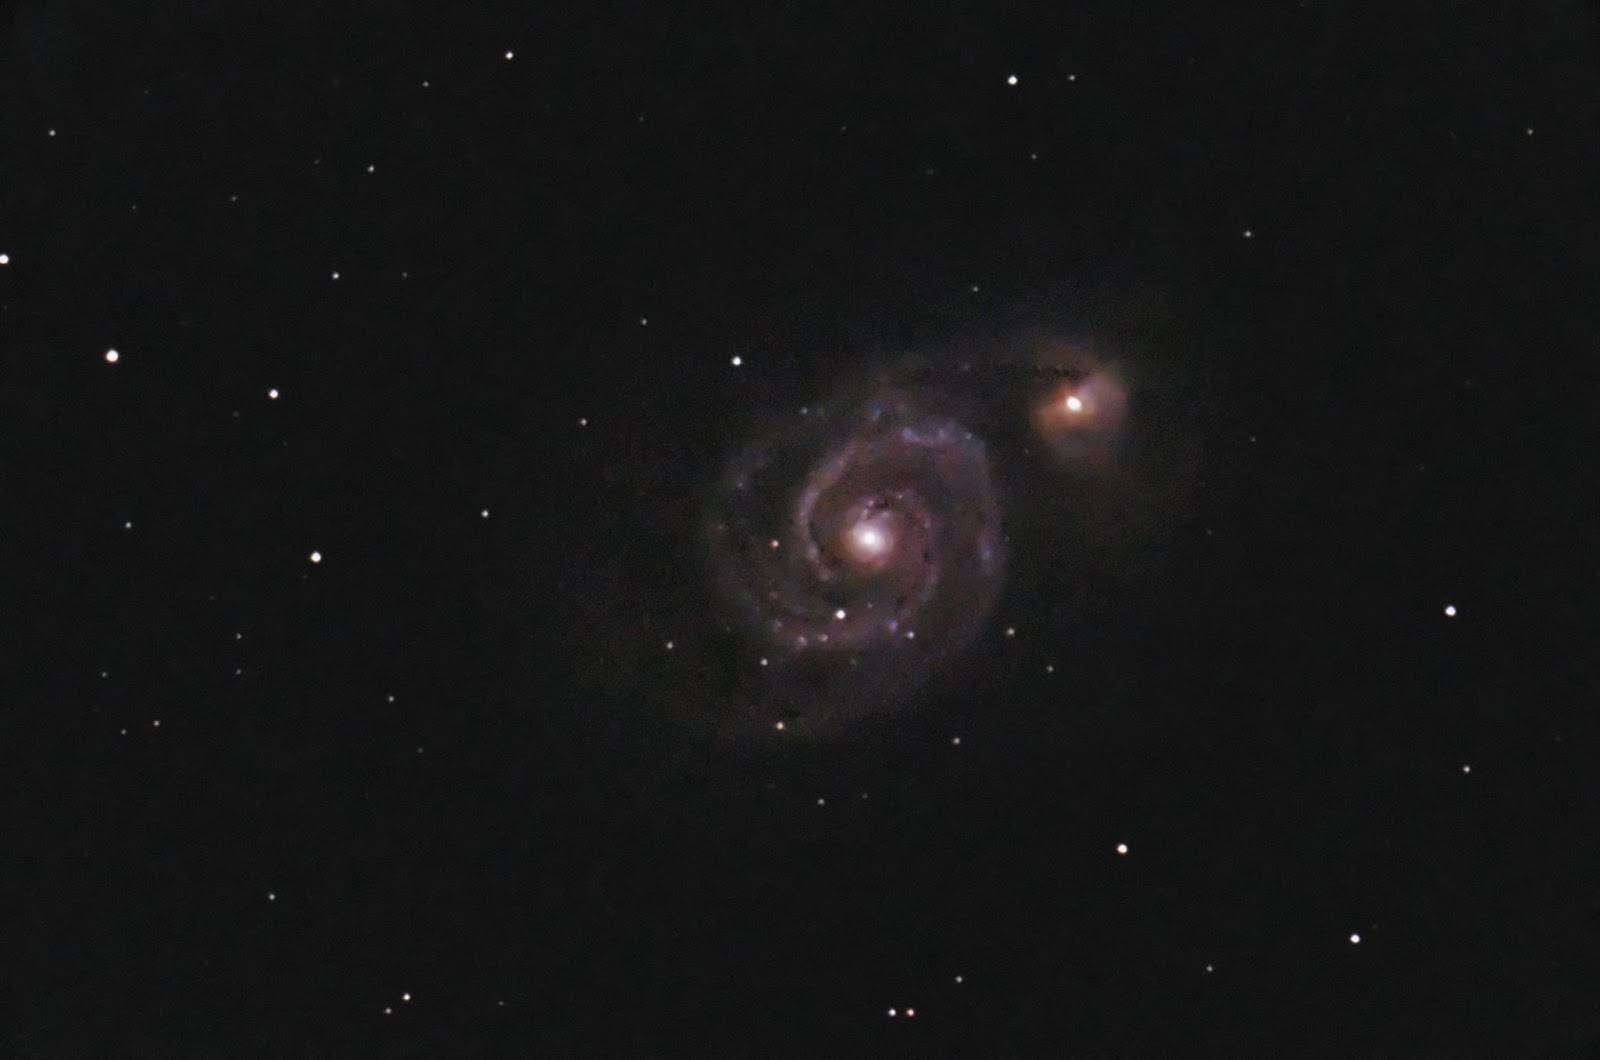
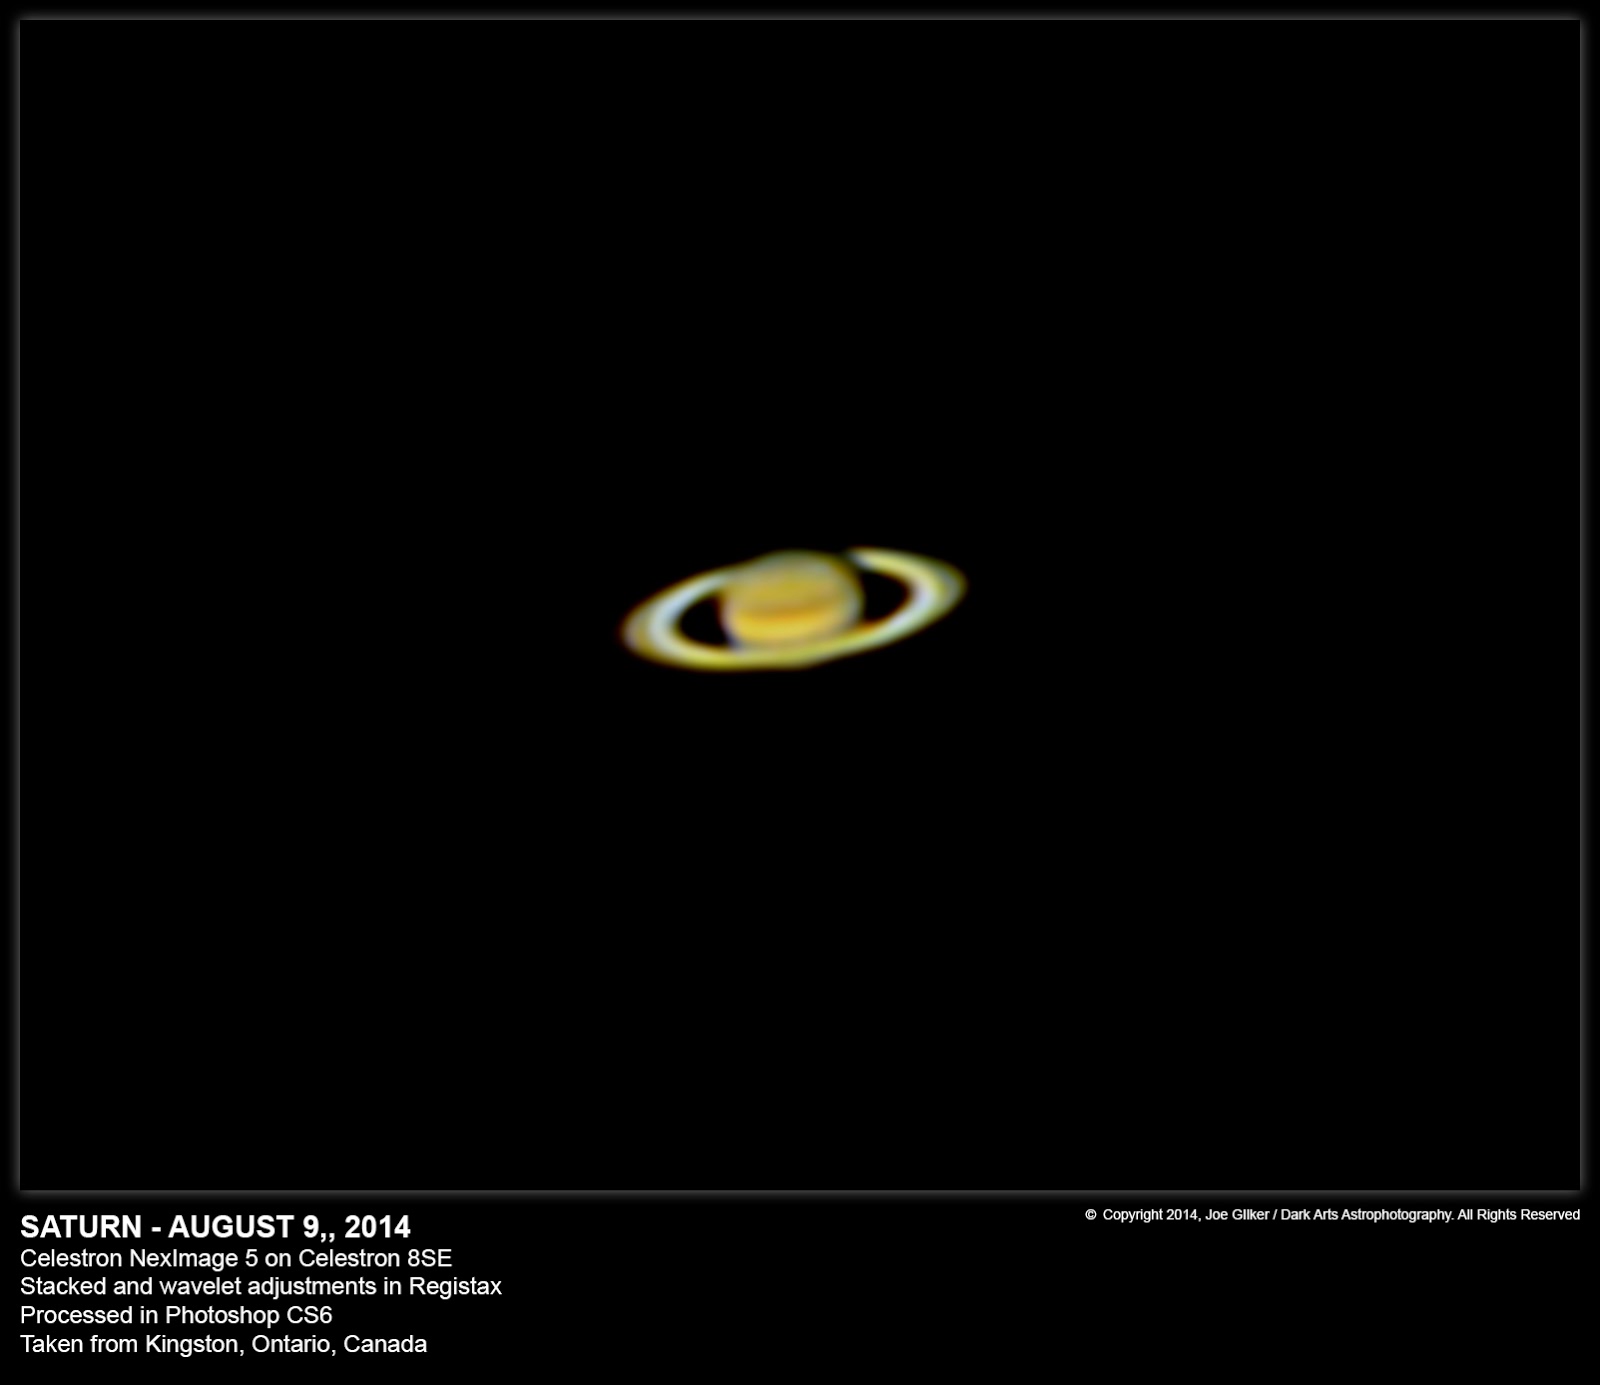
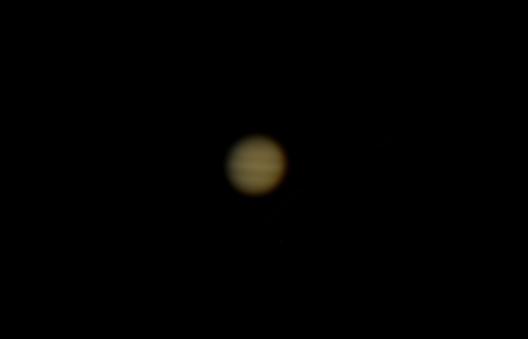
So it’s been a while since my last writeup. I guess I could and SHOULD have written some stuff, because I’ve been quite busy on the astro-front this summer. Anyone who’s following my Facebook page, the different Facebook groups I’m a member of, or my Flickr page will see I’ve been quite busy with photography!

Not only have I been taking pics of the sky, but I’ve been branching out a bit learning to use my camera on stuff that isn’t in space for a change! So far, it’s been mostly landscape, cityscape and night photography. I’ve also been dabbling in time lapse photography, which I’ve really been enjoying. As a result, I didn’t want my wonderful Nikon D7000 to be permanently attached to my scope. And I like this camera specifically because the 16 MP sensor in the D7000 has the best low light performance of any other Nikon or Canon crop sensor. So I decided that rather than buying another expensive camera, I would get myself a used Nikon D5100, which shares the same sensor and processor as the D7000. This camera is lighter on features, so it would become my main astro-camera (to be full spectrum modded in the future) while my D7000 would be used to shoot other stuff. And I’ve been getting a lot of use out of both! For the $325 I paid for my D5100, it was a brilliant purchase! Continue reading “When The Stars Align”

Hitting The Mark

Since I started doing astrophotography almost 3 years ago, it’s been a learning curve. I never stop learning new things. I can see my constant improvement as I move ahead, but despite that, I’m still my own worst critic.

I’ve had a few images that people have raved over. Yet, I look at them and I see flaws, faults, errors, and think of all the ways I could have done it better. And in many cases, I’ve revisited the subjects in question and have improved them significantly. Still not always to where I would want them to be, but improvements nonetheless.  I went over this self-criticism and how it’s helped me improve my work in my Sept 2014 blog entry Striving For Continuous Improvement Instead of Perfection.

While I’ve had some very good results over the past 3 years, I always look at my work critically and think that there’s room for improvement. And rightfully so, because things can almost always be done better. That’s how we improve at our craft. Continue reading “Hitting The Mark”

My Original Astro Photo Revisited and Reprocessed

Hi everyone. First off, I have to say it’s nice to be writing this. It’s been over 3 months since my last entry, and almost as long since I’ve been out with my gear. Winter has been rough, to say the least. Mountains of snow and bitter cold have prevented me from going out with my gear.

Winter is when the skies are the less turbulent. Many night I looked at the Clear Sky Chart to see excellent seeing and transparency – far better than normal conditions I get around here. Unfortunately, I’m also looking at nights where the temperatures are dipping to -20º C or colder.

It’s easy to dress for the cold and stay warm. And when imaging in less than hospitable temperatures, I usually sit in my car with the heat or A/C on and wait out the imaging session. But the cold really does play havoc on my gear. Electronics don’t like cold. And the more digital and high tech my setup gets, the less it likes the cold. My hand controller’s display pretty much stops working at temperatures below -5º C, so I’m not even able to do my basic mount alignment. My laptop doesn’t like the cold either. The display tends to get wonky and it generally performs very poorly. And there’s also the issue of batteries. My camera’s batteries which can normally give me 3 hours of continual shooting will barely last 30 mins in that kind of cold. Even my deep cycle marine battery that I use to power my scope, laptop and other accessories fails to hold up in this kind of cold.

So as per usual, December to March are pretty much months where I have to feed my astronomy fix by simply looking at images other people have posted. But now that the weather is warming up, I’m getting my gear squared away and getting ready for some great shoots. Finally having an auto guider set up will allow me to shoot some targets that I had previously attempted, but never managed to get to my satisfaction.

One such target is M51 – The Whirlpool Galaxy. This object is one of my favourites, and holds a special place with me as it was the first deep space object I ever photographed back in September 2013. I didn’t own any type of camera other than a point and shoot at the time and knew nothing about photography. I had a telescope, and my friend Kevin had a Nikon D60 and a T-mount and scope adapter. So we connected his camera to my 8″ Meade LX90 and proceeded to attempt to shoot M51

The results were mixed. We did manage to capture our target, despite many mistakes being made along the way. At the end of the photo session, we had 50 useable 10 second exposures of M51, and some questionable calibration frames (accidentally switched to a lower ISO setting for the darks and bias), But nonetheless, we had captures something.

The next step was a real trial by fire. I basically knew about post-processing. I watched several tutorial videos on YouTube on how to stack images in DeepSkyStacker and editing in Photoshop. I didn’t really understand what I was doing, but I was mimicking what I was seeing. And at the end of it, I got an image of M51. It wasn’t great, but nonetheless, both Kevin and I were ecstatic about the result. We didn’t think we’d actually captured anything useful at all at first, so it was nice to see we had succeeded. It wasn’t a great image by any stretch of the imagination, but all things considered, it certainly wasn’t a failure. It showed that we were at least on the right track. And important lessons were learned along the way.

My very first deep sky image

Earlier this evening (which will be yesterday by the time this is published), I was sorting through old data and found my original images. I decided to try stacking it again and running it through Photoshop using the tools and experience I had built up over the last 30 or so months since this image was originally taken. I wanted to see just how bad or good that original data was.

After about 45 minutes of playing around, I was pretty impressed with the results. The background was far noisier than I had expected, but I wasn’t surprised considering the sky conditions at the time and the fact the calibration frames were bad. But I like the result. Now that I know how to colour balance my images, I was able to make it look a lot more natural. I also didn’t burn the cores of the galaxies out when stretching the histogram. And I managed to pull a lot more detail and contrast out of the spiral arms and the surrounding clouds of stars and dust  – details that were invisible in the original image. But the part that surprised me the most though was that we managed to get this kind of detail with only 8½ minutes of integration time.

Reprocessed data from my original M51 image

All in all, this image is what it is – my first attempt at astrophotography. It was shot under poor seeing conditions and light pollution with a low end DSLR by a couple of guys with no experience. Not too bad considering it’s faint galaxy 35 million light years away. I’m quite impressed with how good it actually turned out now that I see it processed properly. And it motivates me to capture this object again soon.

Experience and equipment were limiting factors at the time this image was taken. I’ve since taken much better images of M51 using my 120 mm, f/5 refractor while my larger scope was out for repairs, but long to get high resolutions, long exposure images of it using my 8″ SCT. I tried on a couple of occasions last summer after I got my big scope back, but failed due to tracking issues and dew problems. By the time I got my kit together in late summer, M51 was far too low on the horizon to photograph, So I had to scratch M51 off my 2014 target list.

This year, I’m ready. My mount is ready. I have my autoguider which will allow me to take long exposures with perfect tracking. And I have my dew heaters to keep my primary and guide scope optics dry. This year I will finally manage to revisit M51 and capture images that will do it justice.

So until next time, clear skies and keep you eyes to the sky.

The Universe Wants To Kill Us

Today I’m writing something a little different. Normally this blog focuses on astrophotography and all things related. Today I’m taking a step out of that paradigm and speaking on a slightly more morbid topic – how fragile life on our planet really is and how easily and quickly it could be eradicated.

It’s good to be alive. And most of us don’t realize really how fortunate we are to even be here in the first place considering the universe is trying to kill us at every turn.  We live in a harsh, deadly universe.  At every opportunity, from the microscopic level all the way to the macroscopic scale we can’t even comprehend, the universe wants to kills us.

At the microscopic scale, you have a plethora of hazards to life – some natural, some man-made. We have bacteria and viruses that will kill us if left unchecked. Before our era of modern medicine, these pesky bugs would regularly wipe out a fair percentage of humanity on a fairly regular basis. But still there are bugs out there that will kill us dead that we can do nothing about.

At a natural level, we have creatures – from smallest spiders to large predators – who would kill us in an instant, either for food or just from perceiving us as a threat. There are toxic plants that can kill us. And of course, we have the most destructive species of all – humans. We’ve been responsible for the culling of more of our own numbers than anything else to date. And we can use anything from the largest items to the smallest (harnessing the power of the atom) to do it. We truly are the ultimate killing machine, and the only species on this planet that regularly kills members of its own species.

On the planetary scale, we have all kinds of hazards just looking to kill us. There’s climate and weather phenomena such as tornados and hurricanes, droughts, floods, etc that rack up a healthy death toll each year. From a geological standpoint, plate tectonics cause all kinds of nasty things such as volcanoes, earthquakes, tsunamis, etc. Millions have died from these events through history. And many more will in the future. As an example, should the caldera of the Yellowstone super volcano blow its top (and it’s about due), life on this planet as we know it would cease to exist.

We haven’t even left terra firma yet, and already we have incredible odds stacked against us and our survival.

On the scale of the solar system, we’re faced with another group of potential threats to our survival. The biggest and least obvious is our source of life on this planet – the Sun. It could end life on Earth in an instant with a single direct hit from one lucky X-class flare. We’ve been grazed by some rather large coronal mass ejections in the last few months that could have had serious effects had they been direct hits. And in a few billion years, it WILL be the death of Earth as the sun swells into a red giant and engulfs the inner planets, possibly even the Earth. Whether life will still exist on Earth at that time is unknown, but regardless, the sun will be the eventual destruction of our planet if nothing else gets us first.

And then there are the space rocks and other large objects floating around our solar system. Everything from meteoroids to asteroids and comets that could come around and crash our life party on our blue marble. They have hit us before, and will hit us again. We’ve just been fortunate in the last few hundred thousand years to not have any significant impact that had a significant impact on life on this planet. The recent space-rock that blew up over Russia, as well as the Tunguska event of 1908 show us that we’re very vulnerable to potential life-smashing hazards from space.

And then we move out of our solar neighbourhood and into interstellar space. Again we’re faced with multiple perils. It’s generally accepted that there are rogue, invisible black holes moving around through interstellar space. If one were to interact with our sun’s gravity and be pulled in, then it would mean destruction of our solar system. There are also rogue planets that were thrown out of their parent star’s orbit drifting through interstellar space. Should one come our way and enter our solar system, the outcome could be disastrous. Even if there was no direct collision with another body in our system,  orbital equilibrium would be thrown off causing stable orbits of planets to be thrown off, perhaps catapulting us into the sun where we’d burn, or out of the solar system altogether where we’d freeze. Again, more ways the universe is trying to kill us. Granted, the odds of this happening are quite low.

On a less chance-based scenario, if any large star in our immediate stellar neighbourhood (within about 50 light years for giant stars, 100 light years for supergiants) were to go supernova, the earth would be drenched in gamma radiation and all life destroyed in fairly short order. To steal from Admiral Ackbar from Star Wars, “Our ionosphere and magnetosphere can’t repel firepower of that magnitude”. And we wouldn’t even know about it until it hit us.

And then we move up to the galactic scale. Our galaxy is constantly in motion, with our solar system orbiting our galactic core once every 230 million years. As we move through in our little galactic arm, we have other objects in motion at different rates and different trajectories. We traverse dust clouds, areas with other star systems, etc. All we need is to get too close to have a gravitational interaction between our sun and another object, and it could be lights out once again.

And then we move up to the inter-galactic scale – the largest we’re really able to comprehend. A collision with another galaxy could be the end of our little world. And it’s already in the process of happening. Our nearest large galactic neighbour, the Andromeda Galaxy (M31) is currently 2.4 million light years from our own Milky Way and is moving towards us. Our 2 galaxies will collide and merge in about 4 billion years. This will cause stellar collisions and widespread destruction, as well as spark a lot of star formation as we merge over hundreds of millions of years and form a new elliptical galaxy. We may survive it unscathed, remaining as a member of this new galaxy, or our solar system may be one of the billions that will be flung out, becoming a rogue solar system travelling in the blackness of space between galaxies.

But despite the odds being so stacked against us at every turn, here we are. Some will call our presence here chance, while others will invoke spiritual or religious reasons for our existence. In the end, the cause is irrelevant. Whatever it is you may believe, the one inalienable truth is that we’re here, we’re alive, and all that despite our universe trying to kill us at every turn.

We often say that life is short. When considered on the universal time scale, it’s even insignificant. But on our own time scale, it’s just best to be content with what we have and enjoy it while we can. Because we won’t be for long, and any of the things listed above could end in a blink of an eye without us even realizing it. We need to just realize how lucky we are to be here, be happy, and enjoy our existence. And hopefully we manage to find a way off this rock we call home and settle elsewhere in the galaxy in order to not be exterminated should any of the above conditions prevail.

The Difference A Year Can Make

When looking ahead, a year always seems like a long time. But when we look back, it really seems only like yesterday, despite the fact that a lot may have happened in that period of time.

When I consider where I was with astrophotography exactly 1 year ago, I found myself just starting to be comfortable with my equipment, the use of it, and the post processing of my images. I was at the point where I knew enough to be able to get decent results some of the time. If I managed to get acquire good data, the post processing went well. If my data was difficult, chances are I’d have one hell of a time processing it and would end up junking it. And by junking it, I don’t really mean deleting the files. I just meant filing it away on my network storage in my image archive.

In the last year, I’ve become far more proficient with Photoshop and other post-processing techniques. I’ve revisited old data of deep space objects a few times and played with it seeing if I could improve on the original images. Overall, I’ve noticed huge improvements in my reprocessed data just because I now actually understand what I’m doing in Photoshop. I’m not just repeating something I saw in a tutorial video hoping it works out. In a couple of cases, I managed to pull up old data that I thought was trash and actually make it work.

But there was one area where my experience is still slim, even to this day. That’s lunar and planetary photography. I’ve done alright with lunar imaging. Wide field lunar imaging using my DSLR camera is pretty good. I have a decent handle on that and the post-processing required. But imaging with my Celestron NexImage 5 had given me mixed results. I had gotten some pretty decent shots of the moon overall, and a few so-so images of Saturn and Mars. But I never seemed to really come close to what I’d seen other people doing. I was quite unsure if I was doing something wrong, or my camera was really just overpriced junk.

To be fair, I purchased my NexImage 5 in May hoping to get shots of the planets through the summer via my 8″ Meade LX90. Schmidt Cassegrain scopes are great for planetary and lunar imaging due to their long focal lengths and the great resolution their larger primary mirrors can deliver. But as luck would have it, my LX90’s mount died 3 days after getting the camera. And for anyone who’s followed this blog or my astronomy adventures via the various astronomy-related Facebook groups I’m a member of, you’ll know the issues I had dealing with Meade to get my scope repaired. I chronicled the ordeal in another blog entry earlier this year.

So while Jupiter, Saturn and Mars were at their prime, I didn’t have the scope the NexImage 5 was intended to be paired up with.. By the time I got the scope back at the end of the summer (still broken) and got it operational again, all 3 planets were basically setting just as night fell and I never got a change to image them with my LX90.

The same day I bought the NexImage 5, I also bought my Sky-Watcher 120 mm f/5 refractor and AVX mount, so luckily, I had a scope to use through the summer. I did make several attempts to image the planets using that scope. I got a couple of acceptable shots of Mars and Saturn, but the results were rather underwhelming. The small scope is intended for wide field imaging, not for planetary use. Although I did get some decent shots of the moon with it, including a really nice high resolution mosaic of the moon assembled for 16 different images stitched together.

Flickr link: https://www.flickr.com/photos/crunchmeister/14862673035/in/set-72157646290115524

Aside from that, most of my planetary images were just borderline acceptable, My 2 best were shots of Mars and Saturn taken on May 24 as seen  here.

Flickr link: https://www.flickr.com/photos/crunchmeister/14264099871/in/set-72157646854022304
Flickr link: https://www.flickr.com/photos/crunchmeister/14043313980/in/set-72157646854022304/

All things considered, I’m certainly not disappointed with either of those shots, but compared to my deep sky and widefield imaging, they left a lot to be desired. And of course, I knew the scope was the issue. Mars is difficult even in larger scopes. I’m in no way disappointed. The image of Saturn is also quite good considering the equipment that it was shot with. Since I barely knew what I was doing in post processing with planetary images, I think the results were good all around. But I was DYING to try out my NexImage camera on my LX90.
In August, my main astro-buddy Kevin finally got his own scope – a Celestron NexStar 8SE, an 8″ Schmidt Cassegrain. So having access to an 8″ SCT that was very much comparable to mine, we decided to test my planetary cam on it. As luck would have it, the atmosphere was terribly turbulent with less than ideal seeing conditions and the planets were low on the horizon, but I had to try anyway. And the resulting image I got of Saturn was a vast improvement over my refractor. It wasn’t great by any means, but finally I was getting good resolution and colour. The big scope’s extra magnification and aperture made a huge different.

Flickr link: https://www.flickr.com/photos/crunchmeister/14890583022/in/set-72157646854022304/

While this was a huge improvement over my past attempts, I still wasn’t truly satisfied with my results. But it was an improvement, and at least it showed that really I could do much better than what I’d been doing. Unfortunately, I’ll have to wait till next spring when Saturn is once again visible to try to top this image. In the meantime, I have some other old data of Saturn that I want to see if I can improve on.

But this has been a bit of a digression of the topic of this blog entry – trying again with failed data. But I felt I had to go on this tangent and put this info and these samples out there as a preamble (along with some eye candy) so it fit in the great context of the story in terms of what my previous planetary imaging experience had been.
While my hands-on experience with planetary imaging has been fairly limited, I have learned enough about Photoshop and other tools of the trade that when I saw some of my older data that I had written off as “scrap”, I knew it could be salvaged. The best example I’ve come up with is my first attempt at shooting Jupiter back on Nov 4, 2013. I was out shooting other things that night, and Jupiter rose. I had my Nikon D7000 mounted on my LX90. So I took a series of images of it. Now, for those in the know, a DSLR on an 8″, f/10 SCT is not the ideal for planetary imaging, but I thought I would try it out. With my total lack of knowledge on how to process images at the time, this is the best I could come up with.

Flickr link: https://www.flickr.com/photos/crunchmeister/10700140875/in/set-72157646854022304/
So you can definitely tell what planet it is, but it’s dim, and there’s really no detail in it at all. I uploaded it to Flickr anyway because it was my first image of Jupiter, and it would be the benchmark by which I would judge future attempts.

And this is the data that I came across in my sorting yesterday. I saw the source images, and to my slightly more experienced eyes, it actually looked pretty good. It certainly wasn’t the train wreck I had originally considered it to be. So I took it upon myself to see what I could do with it.

Imaging my surprise after stretching the histogram and 4 Galilean moons jumped out of the image! I couldn’t see them in the source frames, but there they were! I was amazed. And I started messing with different processing techniques to sharpen and enhance the image. After a couple of hours, I finally settled on this as a final version.And I have to say, I’m amazed with the result.

Flickr link: https://www.flickr.com/photos/crunchmeister/15736900025/in/set-72157646854022304/

In terms of wide field images of Jupiter and its moons, this is actually pretty good. I had no idea that the old data I had collected was this good! Had I known this was possible last year, I would have put more effort into it. But the frustration of not being able to do anything with it due to my inexperience caused me to give up on it. Until now, that is. And I’m glad that I returned to it.

So I guess this really goes to show what a year’s worth of experience using post processing tools can really achieve. I certainly don’t consider myself an expert in the field by any means. I’m still very much a novice. But results like this really serve to validate the knowledge and experience I’ve acquired in the last year. And it makes me hopeful for what I’ll be able to achieve in another year. And perhaps even sooner, as Jupiter is starting to rise on the eastern horizon at about midnight. It’ll be high enough to image earlier in the evening very soon, and I fully intend to take advantage of that and get as many images of it as I possibly can. And Saturn will be following suit shortly thereafter, giving me yet another window of several months to try to surpass my previous attempts.
The lesson learned here is that just because I’m not able to do anything with difficult data I’ve collected today doesn’t necessarily mean it’s wasted. At some point down the road when I get better at the dark art of Photoshop, I may just be able to salvage it, as I’ve done today.
So now I must return to the sorting of my old data to see what other potentially hidden gems I can fine. So until next time, clear skies and keep you eyes to the sky.

(Auto-) Guiding Light

The moment I had been waiting for now for months was finally on me. I got my autoguider, guide scope, dovetail, and finally my dew heaters as well. The 2 issues that plagued me the most – tracking and dew – would finally be vanquished!

My rig all set up with all its wiry glory

I headed out to my regular spot in an industrial park just outside of town and got myself set up. The first issue was cables. So many cables to deal with. Most were dangling around (I know, bad), but there was no wind, so at least that wasn’t affecting my imaging.

On a side note, I’ve bought some velcro cable ties, so next time that won’t be an issue. But needless to say, for this evening, I had to deal with this tangle of wires the best I could. It wasn’t pretty, but it worked. I’ve got a better setup planned for next time that will result in the laptop sitting in the warm car with me.

It took a lot longer than it typically takes me to set up this new rig. There was so much to connect. In my head, I knew what needed to be done and it isn’t terribly complicated. But actually doing it always presents some challenges in themselves. I did manage to get everything connected the first time without issues though. It just took me a lot longer to get it all sorted out than it typically does. Finally, I was polar aligned, the scope was aligned with 2 stars + 4 calibration stars. I got my focus on Vega using Backyard Nikon, and I was ready to fire up PHD and test out my new autoguider.

NOISE!!!

And that’s when things got interesting / confusing. I had read the instruction manual that came with my Orion StarShoot AutoGuider. I’d played with it at home in day light to get familiar with it, but I wasn’t prepared for the screen full of noise that PHD presented me. I was baffled. I saw no starts. All I saw was a screen full of noise. I played with the camera gain, gamma adjustments, etc, and still couldn’t see anything. I opened up the manual and read it again, but I couldn’t figure it out. I was confused and didn’t know what to do.

So I made a quick post to the Amateur Astrophotography Magazine Facebook group. I knew there would be someone that could help me out. And sure enough, responses started pouring in almost immediately. With some excellent advice from other more experienced imagers such as Mitchell Tubbs (East of Jupiter), Bubba Daniels, David Pointer, and Phil Quandt who use autoguiders, I finally managed to get my autoguider working. Thanks for the tips, gentlemen. You got me off on the right track!

It turns out my primary issue was that my exposure times were too short. I guess while playing around with PHD at home, I had set the exposure time to 0.2 seconds and left it there. That really wasn’t long enough of an exposure to register images of the stars or even to get focus with in the first place. Once I managed to acquire an image with the autoguider using Vega as a target, I managed to get my guide scope in focus. Once I had that, things started going smoothly at last. Once PHD calibrated, I was good to go.

My tracking graph in PHD was a little erratic. Not terrible by any means. My images did turn out quite well and my stars are perfectly round, so it looks like everything is within good tolerances, but the tracking wasn’t quite as smooth as I’d seen on other peoples’ tracking graphs. I’m not sure what the exact cause of this is. My mount was properly polar aligned, or at least I think it was. I’ll have to be more careful aligning it next time to see if that helps

My first order of business was to test out the tracking now that I had the autoguider. Previously, I’d been unable to track using this scope at f/10 for more than 90 seconds without getting some trailing. So it was time to put things to the test. The first target of the night was M81 with 300 second exposures. I’d shot this target before using this scope. However, I had shot it at f/6.3 using my focal reducer and had shorter exposures.This time, I wanted a higher power view of the galaxy solo. I got over an hour of data on it, but for some reason, neither DeepSkyStacker nor MaximDL will read about half of the exposures. I’m not sure what the issue is there, as they should all be good. But in any case, for the test run, it worked out well. I got a fairly decent view of it. Nowhere near as good as I would have hoped, but since this was really just a test for my tracking, I’m pleased with the result.

Flickr link: https://www.flickr.com/photos/crunchmeister/15005613303/in/photostream/

I’m certainly not disappointed in the result. It doesn’t have as much detail as I would like, but that’s the down side of imaging at a high focal ratio. You need a lot of good, clear exposures to create a final image that doesn’t have data gaps. M81 happens to be bright enough that I managed to get a good image despite only having 20 minutes of data.

The second target for the night was one I had never shot or seen before – M1, the Crab Nebula. I’d been wanting to get a shot of this one for a while now, and I figured this was as good a time as any to do it. I was hoping for something better, but unfortunately, it seemed my focus was off. Normally I try to refocus between targets, but I didn’t this time. I got 8 shots of it, but 6 of them were quite blurry and didn’t make it into the final image. I didn’t think it was quite good enough to post up on my Flickr page, but it was good enough to at least share on my Facebook page as a “failed attempt”.

Facebook link: http://on.fb.me/1zcmxgj

I had originally intended on getting more of M1 than I did, but realized that Orion had risen. And my ADD kicked in, making me want to switch targets. All in all, considering my focus was off on M1 and I didn’t realize it, that wasn’t a bad idea. My dilemma was now whether to shoot M42, the Horsehead Nebula, or Flame Nebula. All 3 are amongst my favourites. Having already managed good shoots of M42 and Flame in the past, I decided I’d turn the light gathering capability of my scope on the Horsehead, since I had never gotten an image of it that was to my satisfaction.

Flickr link: https://www.flickr.com/photos/crunchmeister/15439212238/in/photostream/

The detail that I managed to pull out of this left me pretty impressed. Like my image of M81, there’s a grainy finish. It’s not so much due to noise, but rather the lack of data. While the Horsehead is clearly visible with bright red shades, there are a lot of gaps in my data due to the short integration time. A mere 30 minutes of exposure time at f/10 is not enough to capture this dim object and all the subtle gas clouds surrounding it. But still, I was very impressed. In previous shots of this object, I had actually been shooting the Flame Nebula with my camera and a 300mm lens or with my widefield f/5 refractor. While I managed to capture the presence of the Horsehead, detail on it was never clear. This time, I clearly captured it, despite the “noisy” appearance. Far from perfect, but the level of detail here is impressive.
Lessons learned

While the imaging from this session is far from what I’d call spectacular, it was a successful evening out nonetheless. I learned to properly set up and use my new equipment, which is always my goal the first time I’m out with new gear. But the real successes of the evening were the lessons I walked away with.

Autoguiders are great!  They require some extra work to set up, but once set up properly, they’re essential for long exposure photography and will do a wonderful job of keeping your mount tracking.

Take extra care to polar align the mount as accurately as possible, including doing a second polar alignment after my 2+4 mount alignment is complete.

F/10 is a difficult ratio to image at, especially when you have a 2m focal length. I now know I need a lot more integration time to get clear images out of my setup at f/10, Chances are I’ll likely stick with f/6.3 using my reducer for most of my imaging. It will be a lot more forgiving and will allow me to get more complete images in less time.

Take the time to re-focus between targets to ensure good images. Had I done it in this session, I would have had a semi-decent image of M1.

So all in all, I’m pleased with the outcome of this session. I quite look forward to heading out again at the first chance I get to put this setup to the test again.

So until next time, clear skies and keep your eyes to the sky.