(Blog updated November 2016)
Shooting the night sky for the first time can be a daunting process that can be a challenge even for an experienced photographer doing it for the first time. You’re operating under a completely different set of rules than you would shooting more typical targets in either natural or artificial light. So I figured I would put together this brief guide outlining what equipment is needed and the technique to get the best results out of your time under the stars.
Things you need:
- DSLR camera with Live View (LV) or mirrorless camera;
- Wide angle lens with an aperture of f/2.8 or better;
- Sturdy tripod;
- Sturdy ball head or pan-tilt head (ball head preferable);
- Remote shutter control (optional in some cases);
- Extra batteries; and
- Dew control
Camera
DSLRs are great for shooting the night sky, be it for tracked long exposure images or widefield nightscapes. Many people think you need an expensive camera to do this, but really, you don’t. As in any case, better quality equipment will yield better results, The camera is definitely a factor, but you can still get great images even with a low end or older DSLR, Ideally, at least a good mid-range camera made in the last 5 years would be your best bet. But that doesn’t mean older cameras can’t be used.
Whatever camera you choose, I strongly recommend using a camera with a Live View function, LV is standard on pretty much all new DSLRs, but if you’re buying used, make sure the camera you’re getting is capable of it. LV is indispensable when it comes to finding focus quickly and accurately. You can still use older cameras without a LV function, but focusing will be significantly more difficult. This will be covered later in the focusing section.
My trusty, tried and true cameras are the Nikon D7000 and D5100. I started with the D7000 as it had all the features I could want and was nicely in my $1000 price range at the time I bought it. I used it for most of my earlier astrophotography work – both on a tripod and attached at prime focus on my telescopes, and it’s been an excellent performer. I added the D5100 (used for $325) later. While scant on features for general photography, it has the same sensor and processor as the D7000. Since night photography is done using all manual settings, this is essentially the same camera in terms of performance and photo quality. Both are great cameras widely availalbe on the used market for very reasonable prices.
In the fall of 2015, I purchased a full frame Nikon D750. So far, the results I’ve gotten with that camera have been nothing short of astounding. The wide field of view, great low light performance, and pro-level features for normal photography make it a pleasure to use. I’ve had the pleasure of using it for some aurora borealis photography, but I can’t wait to use it when the Milky Way will be at its prime this summer.
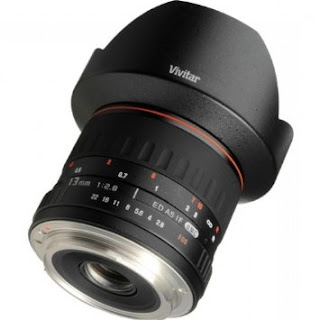
The Lens
As a general rule, the wider angle your lens, the nicer your nightscape will be. Ideally, a prime focus lens of 50mm or less (on full frame ) or 35mm or less (on crop sensor) with a maximum aperture of f/2.8 or better are preferred. You can still get good shots with a zoom lens, but use it at a short focal length as noted above (less than 50 / 35mm) and maximum aperture for best results.
Prime lenses (no zoom) are the ideal lenses to use. They result in much sharper images than any zoom lens.
If you’ve got deep enough pockets, a lens that uses Extra-low Dispersion (ED) glass will be your best choice, as the resulting images will be sharper and free of any chromatic aberration. My favourite 13mm Vivitar prime lens uses ED glass, and the results I’ve gotten with it are absolutely stunning. It’s one of my least expensive lenses at around $400 and it’s the one that I’ve captured all of my best widefield images with, particularly when paired with my D750.
Tripod

A tripod is necessary for night shoots. You can’t do long long exposure images with a handheld camera. A sturdy tripod is highly recommended. A light, rickety tripod takes a few seconds to stabilize after you touch it and is easily shaken by wind. It can even transmit vibrations from people walking by. Get a sturdy tripod. They’re not cheap, but they’re an often overlooked part of a novice’s equipment.
My personal view on this is I don’t see the sense of putting a camera and lens that costs potentially thousands of dollars on a cheap, rickety tripod that can barely support the load. One little accidental bump or kick could potentially snap off a leg and send your expensive equipment crashing to the ground. And for the best results, you need a platform tthat’s as stable and vibration free as possible. And you just can’t get that with a cheap, flimsy tripod.
That said, you don’t need to fork over $700 for an ultra-heavy-duty carbon fibre model. But get something that’s strong enough to support the weight of your equipment, won’t go crashing to the ground with a little bump, and won’t sway in a light breeze. It will save you a lot of frustration and potential expense in the long term.
My personal favourites are the Manfrotto Pro series. I have both the heavy duty 055XPROB and its slightly lighter sibling, the 190XPROB. They offer incredible stability and extreme flexibility in adjustment for everything from astrophotography to macro photography. Both are solid, stable and durable and will last you a lifetime.
Tripod head

The tripod head you use is also important. Whether it’s a ball head or some other head, make sure that it’s steady, operates smoothly and once you lock it down, there’s absolutely no play in it. The quality of your final image depends greatly on the stability of everything your camera is attached to.
I own two Manfrotto 496RC2 ball heads and a Manfrotto MHXPRO-3W 3-way pan/tilt head. All 3 heads use the same adapter plate, so I can swap tripods, cameras and heads without having to change adapter plates on my cameras.
Just ensure that whatever head you get, it’s designed to handle the weight of your camera with the heaviest lens you own. It’s always better to have an over-spec head than one that’s too lightweight for the gear you plan on mounting on it.
Remote shutter release
The remote shutter control is not essential, but a very useful tool to have and I would highly recommend always using one. Handling your camera causes it to vibrate. Even on a rock-solid, heavy duty tripod with a solid head, the act of pressing the shutter release will cause a bit of movement in your camera which will take a bit of time to stabilize after. Using a remote of some sort will prevent this, giving you a sharper final image.
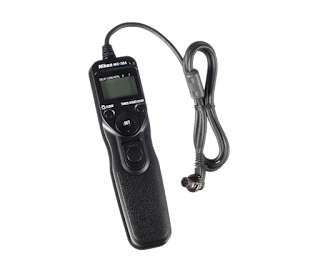
Most DSLR cameras have a shutter delay function. If you set a shutter delay of 2 seconds, you can press the button on the camera, and everything will have a chance to stabilize before the shutter activates. But if you don’t have shutter delay, you will need a way of remotely triggering your camera.
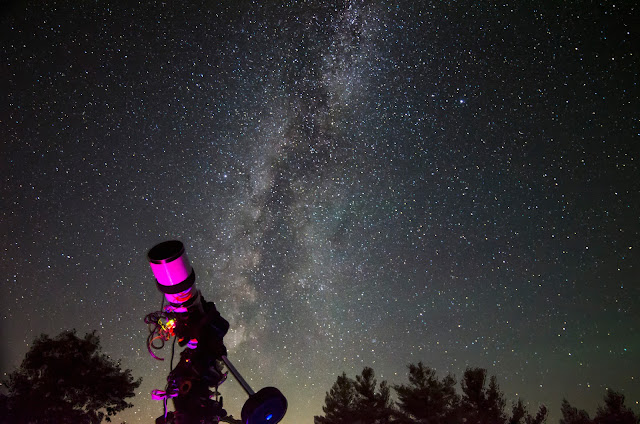
One very handy and versatile type of remote shutter release you can get is an intervalometer as is pictured on the right. This a requirement if you intend to do any sort of time lapse, meteor, or aurora photography. They’re available in both wired and wireless flavours and will have a locking shutter button that you can manually lock down when the camera is in BULB mode. These units can be found on eBay or Amazon very cheaply.
My recommendation is to avoid the brand names, as they tend to be rather expensive with no real advantage. I own a “JYC”-branded knockoff of the Nikon MC-36 remote. It’s identical in size, weight, function and look to the original and works flawlessly. I’ve had it for over 2 years now, use it all the time, and just a couple of weeks ago I finally replaced the original batteries it shipped with.
The cost of the Nikon unit? The cheapest I could find it for new was $180 CDN + tax at a local shop. The cost of the eBay knockoff? $25 CDN shipped from China. You do the math and decide if having a little Nikon or Canon logo on your intervalometer is worth the extra $150 to you.
Batteries
You wouldn’t think this needs to be said, but it does. This is simple enough. Buy extra batteries for your camera and make sure they’re charged. Nothing ends a photo session early on such a sour note as finding out you drove an hour or more to a dark site only to have your only battery die on you within minutes of arrival. The number of times I’ve seen this happen to people is borders on the ridiculous.
Another good idea is adding a battery grip to your camera to house a second battery. This can significantly extent a photo session before you need to replace batteries. But keep in mind that brand name battery grips aren’t cheap. Depending on your camera, they can cost anywhere from $200-400. Knockoff brands can range from $40-80 on eBay or Amazon, and will sometimes come with extra batteries. While this seems like an attractive proposition, most are made of cheap, flimsy plastic. Since you’ll be attaching your tripod plate to the bottom of this grip to attach it to your tripod’s head, you’re potentially instability into your setup, as the plastic will flex when you touch the camera or in a breeze, causing sway.
I can attest to this point from personal experience. I have a knockoff plastic battery grip for my D750. While excellent for handheld use, it’s useless for night photography When mated with the Nikkor 24-70 f/2.8G or Vivitar 13mm (both very heavy lenses), it’s too unstable to use on a tripod. However, I have a Nikon-branded grip for my D7000. It’s made of the same magnesium alloy as the camera’s body. Despite the D7000 being a heavier camera body, it’s rock solid on a tripod with the same heavy lenses.
Dew control

If you’re in a humid climate, inevitably you’ll find that your lenses will start to fog up with dew – another problem that ends many photo sessions short.. You might start wiping the dew off with your lens cloth, but you’ll find this will only buy you a couple of minutes are best.
But it doesn’t have to be that way. There’s a cheap and simple solution exists for this problem – hand warmers. That’s right. Those little packets of chemical hand warmers that you can put in your mittens in winter to keep your fingers warm are your lens’ best friend out on a humid night. They can be bought in large packets at most sporting good stores and other locations. Take them out of their packaging, activate them by shaking them, and then attach them to the top and bottom of your lens using a wide rubber band. And be sure to attach them to your lens at the beginning of your session. You want to proactively prevent dew from forming by keeping the lens a couple of degrees above the dew point. Adding them after the dew has already formed is far less effective, because your entire lens, its elements and internals will have cooled, and it will take a long time for the hand warmers to bring the temperature back up to above the dew point.
Sure, this solution looks silly as hell and some people will laugh at you for it. It’s happened to me. But I’m the one who’s left laughing when they’re packing up early due to dew while my lens is clear despite the fact it’s been pointing straight up all evening.
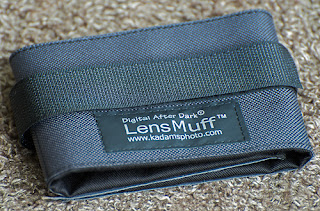
An even more elegant dew control solution is a great little item called the LensMuff from Kevin Adams Photography / Digital After Dark. (Review available here) It’s a small nylon sleeve with a velcro strap that can hold 3 hand warmers. It neatly wraps around your lens and traps the heat of the hand warmers, making it even more effective than just holding the hand warmers in place with a rubber band. I’ve been using these for some time now, and I love them. I’ve even used one on the finder scope on my telescope to keep it dew free. If you’re serious about night photography, this is an amazing product that you really should consider.
The process
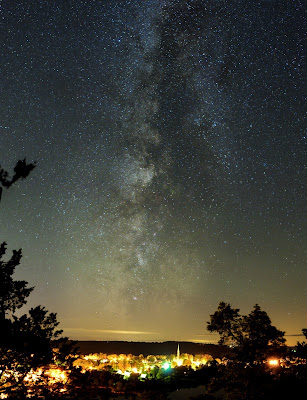
So now you have all the equipment you need. You need to find yourself a dark site away from city lights. The farther, the better. While the sky may appear dark a short distance outside of an urban area, long exposure photography will bring out sky glow you may won’t notice with the naked eye.
Depending on where you live, the best parts of the Milky Way will be visible at different times of year. In the northern hemisphere, the Milky Way is visible before midnight between May and September, with best time of the year for visibility being July when the core is the highest above the horizon. At lower latitudes, more of the core (the good part) will be visible.
You also want to make sure you’re shooting on a moonless night, as moonlight washes out the details of the Milky Way like city light pollution does. The New Moon is the best time to shoot since you’ll have no moon to contend with. For a week or so after the New Moon, the moon will set reasonably early, so you’re still good to get some shots after it sets. The week before the New Moon, the moon will rise late in the night (40 minutes later each day), so you’re good for some shooting before it rises. So in brief, you have about a 10 day window each lunar cycle where the conditions will be great for photographing the Milky Way.
Camera settings
- Manual mode
- Aperture wide open
- ISO setting
- Disable noise reduction
- White balance adjustment
- Exposure time
- Focus
First and foremost, you need to have your camera set to FULL MANUAL mode, or M on your mode selector dial. There’s no automatic setting for the sky. I’ve seen many people struggle with the “nightscape” settings on their cameras, and nothing good ever comes from it! If you have any type of automatic setting on your camera, turn it off.
One very important point that needs to be stated: SHOOT IN RAW MODE. Never shoot the night sky in JPG, as compression will prevent you from being able to properly post-process the image. The files might be larger, but that extra size means extra quality. Set your image to RAW-F, or the finest quality and highest resolution your camera is capable of.
Your aperture needs to be wide open for the lens you’re using to allow in as much light as possible. Depth of field is irrelevant for night photos. You focus on the stars, even if there’s landscape in the foreground. As I stated, the best results will come from a lens that opens to at least f/2.8. The wider the better. My 35mm f/1.8 lens is absolutely amazing for getting fine detail and contrast in the Milky Way. I’ve seen a 35mm f/1.4 lens used, and it basically blew me away with how much difference there was. As with telescopes, when it comes to shooting the sky, aperture is king. Bigger and faster is better for collecting as many photons as possible.
Your ISO settings will depend on your camera. Your ISO is your sensor’s gain, or amplification. The higher the number, the more your signal is amplified. The down side of this is it also amplifies noise generated in your sensor. Modern full frame sensors can easily handle ISO settings up to 3200 or higher. Lower end cameras may only be able to handle 2000 or 1600 before adding too much noise. This is a setting you’ll have to experiment with. I would recommend starting at ISO 2000, taking a shot, and adjusting up or down depending on the noise present in your image until you find a sweet spot you can live with.
Most DSLRs will also have 1 or 2 different noise reduction (NR) routines built in. One is known as Long Exposure NR, the other is High ISO NR. Both sound really good when shooting the night sky, but have their drawbacks.
Long Exposure NR is actually a very usable one. When you take an image, the camera will automatically take a second image at the exact same exposure length and ISO, but with your shutter closed. This is known as a dark frame. This is basically an image of the noise generated by your sensor. The dark frame is then digitally subtracted from your original image, called the light frame. This leaves you with a much cleaner final image. While this sounds good, you now take double the amount of time to shoot 1 picture.
The down side of Long Exposue NR is that if you’re trying to shoot star trails or time lapse, this double time will leave gaps in your trails and give you far fewer frames for your time lapse. Most people find it preferable to either do manual dark frame subtraction, or use no dark frames at all. After a while, you’ll become familiar your camera’s performance and any noise will be easily managed with luminance noise reduction in Lightroom or Camera Raw.
If you want to push your camera and want to do manual dark frame subtraction, the proces is quite simple. Take a bunch of pictures of the sky normally. Before you finish, cap off your lens and snap off a dark frame. In your post processing in Photoshop, you can take this dark frame, layer it on top of your light frame (before making any adjustments to it) in a separate layer, and switch your blending more to “subtract”. This dark frame subtraction will clean up your images of your sensor noise. Just keep in mind that dark frames are temperature-dependent. You have to shoot it at the same temperature as your light frame. If you were out on a cold night, forgot to shoot your dark, and then trying to shoot it inside your warm house the next day, it won’t work.
High ISO NR is another one that seems to make sense at first thought. You’re using high ISO that introduces noise, so why not let the camera automatically remove it? For regular low light photography, this actually works quite well. For night sky photography, the camera can’t tell the difference between faint stars and noise and the camera will detect faint stars in your image as noise and remove them. When shooting the Milky Way, faint stars are what give it its cloudy appearance. Using High ISO NR will basically kill your image. Don’t use it!
White balance is another one of these settings that you need to experiment with. Just don’t use auto white balance. There are different schools of thought on white balance. Some people like to use sunlight / daylight settings, which I find work well. Others choose the tungsten light setting, which also gives good results. Personally, I like to set the colour temperature directly. I find that in post processing, I tend to tweak my temperature somewhere in the range of 3500-3750º K. This tends to give me the best colour balance for the Milky Way. I find this tends to vary on different cameras. I’d say the best is to experiment and find what gives you the colours you like best. In any case, you’ll be shooting in RAW mode (never JPG), so you’ll be able to make your white balance adjustments in post processing, so this isn’t a crucial setting in the field.
Finally, the big setting is your exposure time. This is the one that gives photographers the most difficulty. Because the Earth rotates, it gives the appearance that the sky is moving. If an exposure is too long, stars in your image will change from points to hyphens. You want to be able to expose your image for as long as possible without introducing this star trailing. Your exposure length will vary on the lens you’re using. The shorter your focal length, the longer you’ll be able to expose without visible trailing. You may have heard of the Rule of 600 or Rule of 500. Personally, I use the latter, as it has tighter tolerances.
The Rule of 500 goes as such:
xT = 500 / (f x C)
Where:
xT = exposure time (in seconds)
f = focal length of your lens (in mm)
C = crop factor of your sensor (use 1 for full frame, 1.6 for Canon, 1.5 for Nikon and Fuji crop sensors)
So in my case, I ,mostly use my Vivitar 13mm lens on my D7000 with a crop sensor. For that lens, my exposure time is:
xT = 500 / (13 x 1.5)
xT = 25.6 seconds.
I also like using my 35mm f/1.8 lens for it’s larger aperture when I do panoramas of the Milky Way, so:
xT = 500 / (35 x 1.5)
xT = 9.5 seconds
For comparison, my 13mm lens when used on my full frame D750
xT = 500 / (13 x 1)
xT = 38.4 seconds.
As you can see, the difference between exposure times for different lenses varies greatly, and you’ll get far longer exposure times on a full frame camera over a crop sensor.
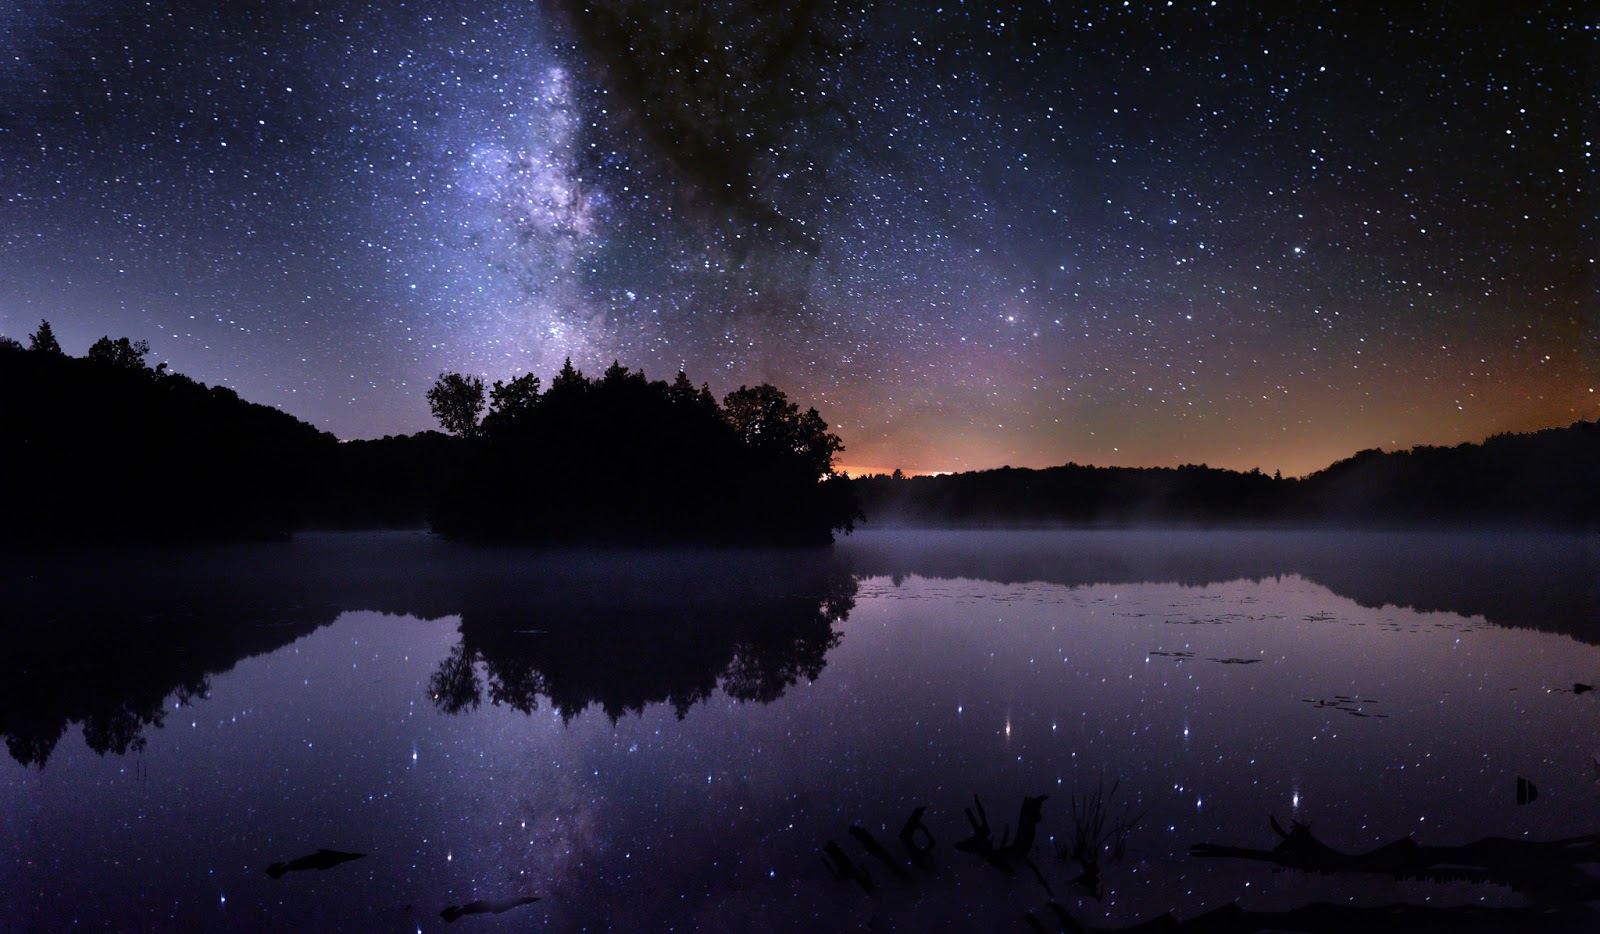 |
| Reflections From Eternity Flickr link: https://www.flickr.com/photos/crunchmeister/18445879194/in/dateposted-public/ |
Getting ready to shoot
So now, you’re ready to shoot! But there’s 1 last, key process to take care of. And for many first time night photographers, this can be by far the most daunting – FOCUS! It will require some tweaking, but with practice, following these steps will make the process a lot easier.
Focus in 7 easy steps:
- Turn off auto focus (very important)
- Find the brightest star you can see in the sky. In the summer from the northern hemisphere, that will be Arcturus, which you can easily find be found by tracing a line outwards from the handle of the Big Dipper. It’s a big orange star. You can’t miss it.
- Using your camera’s viewfinder (not LV), find the star and centre it in your field of view. Get rough focus that way;
- Enable your LV. The star should be visible.
- Using your LV’s digital zoom, zoom in to full power on the star;
- Now using your focus ring, adjust your focus until the star is as small a pinpoint as possible.
- Once you achieve focus, DON’T TOUCH YOUR FOCUS RING AGAIN UNLESS YOU CHANGE LENSES. A small piece of tape can be use to secure the focus ring and ensure that you don’t accidentally knock it out of focus handling the camera.
Now that we’ve covered focusing, it’s worthwhile expanding on a couple of those points. At Step 6, you’ll be adjusting your focus. This can be a bit difficult, as touching your focus ring will cause your camera to move and shake, making focus difficult. This is where having a sturdy tripod with a solid head will make a huge difference. The more stable your support, the less shake you’ll get while adjusting focus, making focusing easier and far more precise.
Step 7 is one I could have left out, but I added on for the photographers that can’t leave their focus rings alone. I’ve noticed a lot of experienced daylight photographers are so used to holding onto their focus rings and constantly adjusting them. And that’s fine for doing daylight or studio photography. but for astrophotography, it’s a big no-no and a habit that needs to be broken. Once you have focus on 1 star, you’re now in focus for anything else in the sky and further adjustments are not required.
At this point, you’re set to shoot and it’s all about your creativity. Composition, adding landscape, and compositing images are beyond the scope of this article. But now you have all the information you need to capture great images of the night sky using your DSLR.
So until next time, clear skies, and keep those eyes and lenses pointed up!
1unmanned
choose a gay video chat free https://bjsgaychatroom.info/
best free gay dating sites in florida https://gaypridee.com/
free gay chat 803 area code https://gaytgpost.com/
100% free gay chat line https://gay-buddies.com/
dating a bi man as a gay man https://speedgaydate.com/
hollywood4fun slots https://freeonlneslotmachine.com/
real money slots online https://candylandslotmachine.com/
las vegas slots https://pennyslotmachines.org/
konami slots for computer https://slotmachinesworld.com/
horseshoe baltimore slots https://slotmachinesforum.net/
fre slots https://slot-machine-sale.com/
argosy free fun slots https://beat-slot-machines.com/
bowser slots mario party 2 https://download-slot-machines.com/
casino joy slots https://411slotmachine.com/
dragon slots https://www-slotmachines.com/
bellagio slots guide https://slotmachinegameinfo.com/
writing chapter 4 and 5 of dissertation https://buydissertationhelp.com/
help with phd dissertation https://dissertationwriting-service.com/