Category: Uncategorized

Practicing the dark arts

Since I started doing astrophotography, I’ve been jokingly referring to it as the “dark arts” to my friends and such. Without knowing any better, most would assume I call it such because it involves taking pictures in the dark. That may be true to an extent, but it’s not why I call it that.I call it that because it’s all about bringing light out of the darkness. It’s about making the invisible visible. It’s about exposing what would otherwise be hidden. And to those who don’t know how it works, it may as well be witchcraft. Actually a couple of hundred years ago, this kind of talk would probably have gotten me burned at the stake.

The picture taking process is really just a small part of it. And really, that’s the easy and most “hands off” part of the process. Once the mount is set up, target found, the camera settings are all adjusted and focus is set, the picture-taking process is a pretty brain dead affair. With the proper equipment like a remote intervalometer / shutter control, it’s actually completely automated.

The “dark arts” part comes from processing the photos. First there’s the stacking process with DeepSkyStacker or whatever other stacking software one chooses to use. This produces the master image that then gets edited in Photoshop (or whatever image manipulation software one chooses to use) after the fact. As long as you have good source data from an in-focus camera with accurate star tracking, this is where the black magic really happens.

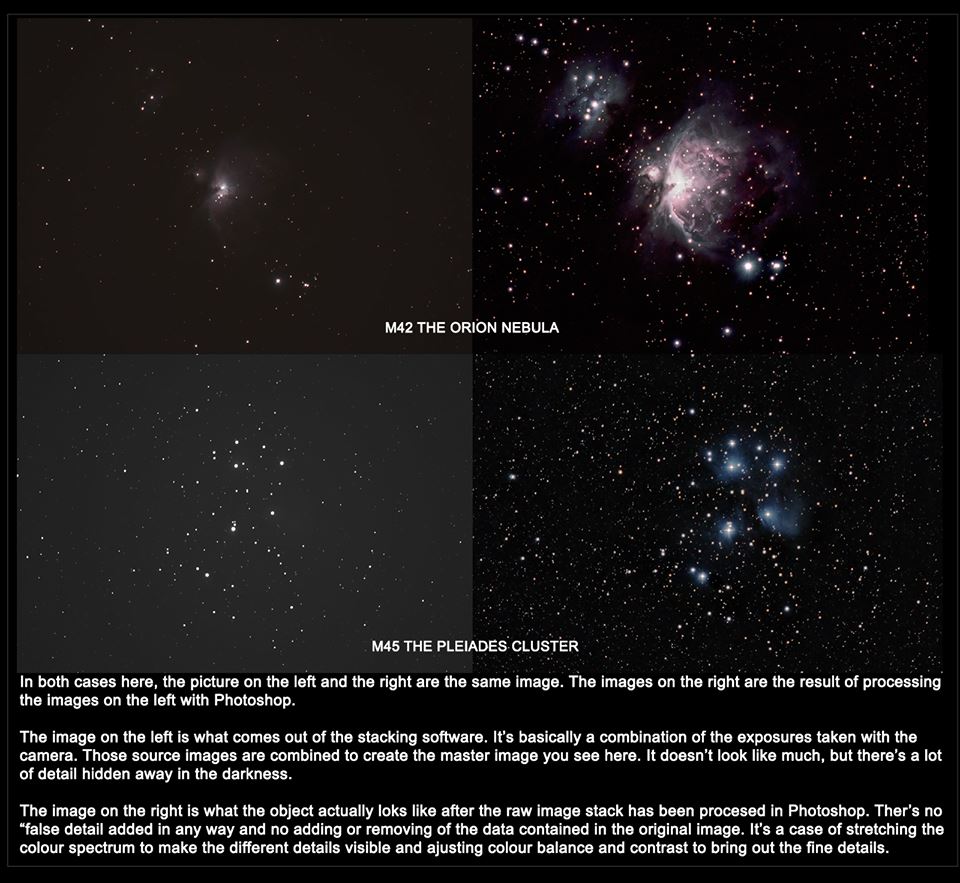
In the image below, you can see 4 images. The ones on the left are the starting point for editing. The voodoo here is taking that dull, dark image and bringing out the hidden pixels. Yes, all the data seen in the right hand images are in the images on the left. But the details are faint. The images on the right are the result of stretching colours, adjusting contrast, and adjusting colour balances. There are other tricks and tools, of course, but that’s the basic crux of it. No data is added or removed from the original dull image. It’s just a matter of brightening the details while darkening the background. The final results really do look like magic – black magic.

That’s the real reason I refer to it as the “dark arts”. Clear skies.

PRODUCT REVIEW – iOptron SkyTracker

WHAT IS IT?

Nikon D7000 with 55-300mm lens on an iOptron SkyTracker

The iOptron SkyTracker is an equatorial tracking mount for taking long-exposure astrophotography with only a camera and tripod.

When properly aligned to the celestial pole, the unit will automatically track the motion of celestial objects, allowing you to precisely take exposures of up to several minutes with at reasonable magnification levels.

The small, lightweight (2.5 lbs) package travels very easily, making it ideal for bringing on trips or just going out to a remote location where lugging around a big telescope may be inconvenient or impossible. Continue reading “PRODUCT REVIEW – iOptron SkyTracker”

Sweet Success!

The last few days have not been without their challenges in processing my images. As I posted yesterday, I got some really great data on my Friday evening photo session, but have been unable to process the resulting images to any degree of satisfaction.
With some support and advice of some of the great folks over at the Astrophotography / Amateur Astronomy Enthusiasts group on Facebook, I managed to  process two of my images not only to my satisfaction, but well beyond my expectations.
The first was a wide field combination of M42, the Orion Nebula and NGC 1977 The Running Man Nebula. The detail that I managed to pull out here was actually pretty stunning considering this was nothing but a collection of 30 second exposures at ISO 800. I really didn’t expect this much detail. I pulled out as much detail as I could. Of course, the core was a big burned out, as is expected from this nebula. I went and found one of my earlier telescopic imaged of M42 where the core was very detailed and the Trapezium was nice and sharp. I scaled and aligned the image and with layer masking I Photoshop added a nice, sharply detailed core to my image.

I also played around with the HDR process. I create an HDR version of my original image, and layered it on at 50% with screen blending. The highlights and shadows just jumped right out of the screen. I finished up by adding a very subtle false luminosity layer. I took the HDR version, converted the image to an Lab Colour format (LRGB) and pulled out the luminosity layer. I layered that over my final image. That brought out some of the nice highlights and subtle detail that would otherwise have gone unnoticed. And this was the final result.
http://www.flickr.com/photos/crunchmeister/11181614644/in/set-72157637130862065
The next to roll off the line was M45 – The Pleiades Cluster. I’d taken a few images of this cluster before, but my images always turned out rather flat. I’d always taken them from a tripod with the camera without any tracking, so I was limited to 1.6 second exposures when using my 300mm lens to avoid any star trailing. As a result of these short exposures, I got really sharp detail and good noise reduction, but never managed to capture any of the beautiful blue nebulosity in the cluster. The nebulosity really required longer exposures which I really wasn’t equipped to handle at the time.

This time around, I managed to pull out 120 x 30 second exposures. This was enough to bring out a fair amount of the nebulosity. I wanted to collect more data, but with M45 being right overhead, frost was starting to form on my camera lens, so I had to quit. But what I did get in terms of raw data left me quite pleased.

My first attempts at processing this image were very frustrating. No matter what I tried, I was unable to get anything but white or grey results. M45 is famous for it’s blue colour, but try as I might, I was unable to pull out these blue tones. Even trying to insert false colour wasn’t working out for me. But it turns out that being inexperienced with Photoshop, I was going about it the wrong way. Advice given to me by members of the aforementioned Facebook group pointed me in the right direction. As a result, I now know how to adjust the colour balance of my images properly to bring out the natural colours.

And the result of my data:

http://www.flickr.com/photos/crunchmeister/11182359896/in/set-72157637130862065/

Now I still have a new image of M31 I need to process, and as I left for work this morning, I set the Flame Nebula image I took to stack again in DeepSkyStacker. Hopefully I’ll be able to apply the new techniques I leaned yesterday to this image and pull out some more detail out of it. I’ll be trying to process my new M31 data after that.  
 
So all around, I must say that I’m very pleased with how things have gone and very pleased with my progress to date. It seems the dark art of astrophotography is really a multi-disciplinary pursuit. It’s dependent not only on the weather and proper setup of the photographic equipment, but also highly dependent on the Photoshop skills of the person processing the image.
And unlike what people may think about Photoshop in how it’s used in the modelling industry to retouch photos and make models “perfect”, when it comes to astrophotography, we aren’t faking an image or editing it in a way that we’re falsifying the data. Photoshop is used to pull out colours and subtle details that are initially hidden to the eye. No false data is added. This is the true appearance of the object being photographed.
So that all for now. Hopefully my next blog update will be the review of the iOptron SkyTracker I’ve been working on.

Clear skies!

Sometimes I wish I knew what I was doing…

 
So on Friday evening, I was out shooting some images using my new iOptron SkyTracker mount. I had some great success with it, actually. The evening wasn’t without its snags, of course, but overall things went really well.

However, I’ve been having a real challenge when it comes to processing my work. I’ve spent a lot of time this weekend trying to process my images. And I can’t seem to get any colour out of them whatsoever. My “worse” image – the Flame Nebula turns out to be the only one that’s displayed colour in the final results, despite being the one that I have the fewest frames for.

I know there’s something I’m not doing right in my processing. I’m not sure if it’s in DeepSkyStacker or Photoshop. Unfortunately, I’m not experienced enough to actually know WHERE I’m erring in my process. It can be quite frustrating at times. But I’ll keep soldiering on.

Also, coming soon will be a review of the iOptron SkyTracker, as it was requested by a few people already who are curious about it.

Clear skies!

Introduction, or who the hell is this clown anyway?

Hi, my name is Joe, but most of my friends know me by my long-standing nickname of Crunchmeister, or just plain “Crunch” for short.

For reasons still unbeknownst to me, I’ve decided to put together this blog to document my adventures in astrophotography. It’s not a serious thing, but more of a spot where I can share some of my photos and explain them in more detail than I can off of just my Flickr  page.

At the time of writing this first blog entry, I’m still very much a novice when it comes to astrophotography, and I’m still working hard to figure out what the hell I’m doing. And even as an amateur astronomer, I’m a casual observer at best. It’s been an intimidating learning process so far and at times I feel like I’m drinking from a fire hose (particularly with Photoshop processing), but I’m seeing improvements already and starting to understand things better. 

So, how did this all start?

I’ve had an interest in astronomy my entire life. I was fortunate enough to grow up in northern Quebec (that’s in Canada) in a small mining town up in the sub-arctic tundra. We had very little light pollution other than street lights from a small town, and we were treated to spectacular displays of aurora borealis on such a regular basis that, especially as kids, we took it for granted.

I didn’t have a telescope or even binoculars, but from the limited reading material I could find on the subject, I knew more than the average kid my age. Or even more than the average adult. I could find several of the major constellations, I knew where the Orion Nebula and Andromeda Galaxy were, and I knew a few star names. I understood the concepts of things like the ecliptic plane, equatorial motion, albeit very basically. I understood the units of measurements like AU and LY. It was all superficial knowledge, it was a nice foundation to build upon later in life.

Alas, I never really “took up” astronomy in my youth, even though I wish I had. I spent a lot of time lying on the ground outside staring up at the dark skies, auroras, and occasional meteor showers, but never took it farther. I never got to look into a telescope until I was over 30 years old. By then, I had been living in the city since I was 18, and hadn’t seen dark skies or an aurora since my youth.

That first telescopic view of the night sky was inspiring. One autumn evening in about 2000, I was visiting friends who lived out in a log cabin out in the boonies far from any city lights. A neighbour had stopped by with his Skywatcher 4.5″ reflector on an EQ mount. The EQ mount baffled me, and even the owner had no real idea how to use it. But to be able to point it up and see starfields, clusters. And then there was the first view of M31, the Andromeda Galaxy. I knew I NEEDED to get a telescope and try this for myself!

I ended up borrowing small scope from my friend for a few weeks. It was a horrendous little Bushnell 60mm refractor on a rickey alt-az mount equipped with cheap 0.925″ eyepieces. While pretty much useless for anything other than the moon, I did spend many hours examining the moon all while cursing out the shaky mount. I knew I  needed something better.

Eventually, I bought my first scope, then a second, then a third, each time moving up in size and capability. And I enjoyed my views of the universe. But of course, aperture fever is strong, so in 2010, I decided it was time to stop playing around and buy something more serious. I picked up an 8″ Meade LX90 ACF, which is still what I’m using as my main scope at the time of writing this blog. Naturally, with that kind of equipment, the interest in actually documenting my targets via imaging became interesting. I knew I had a good foundation for astrophotography with this telescope.

It was in the fall of 2012 that my friend Kevin started really talking about astrophotography. He had a Nikon D60 DSLR, and I had a scope. So if we combined our equipment together, we might just be able to take some pictures! Neither of us had the foggiest idea of what we were doing, but were willing to learn.
M51 - The Whirlpool Galaxy

Kevin ordered a T-mount and adapter for his Nikon camera and we proceeded to unsuccessfully try to take images of the night sky in the early summer of 2013. At that point, we were trying to take shots of Saturn, but it didn’t work out too well. It wasn’t until Sept 15, 2013 that I finally did a bit of research on how to do deep sky imaging and processing and we tried our first deep sky image. The target: M51 The Whirlpool Galaxy.

This was the trigger that got us going. We had a few failed attempts (particularly with M31) from that point on where we got dewed out, clouded out, etc, but this image was the catalyst that got me dedicated to being able to capture high quality images of the celestial wonders I was seeing.

Since that fateful first image, Kevin and I have made several attempts. Most have ended in failure for some reason or another. When Murphy’s Law strikes, it strikes hard. So I eventually went out and bought myself a DSLR camera – a Nikon D7000 – so I could have my own gear and be able to practice outside of the once every couple of weeks Kevin and I could get together. I’ve had some luck by myself and managed to get some nice initial results, despite being a little limited by incorrect equipment.  

M31 - The Andromeda GalaxyOver the past few weeks, I’ve closed that equipment gap. I have a proper T-mount that attaches to my rear cell on my scope, an EQ wedge, piggyback mount, filters, telecompressor and some other odds and ends in hopes that I can take the best pictures that I possibly can.

And I did have some measure of success! I managed (after many failed attempts) to take an amazing shot of M31 using my camera with a 55-300mm zoom lens mounted in a piggyback mount on my telescope!

So that’s it for a rather long-winded introduction. I’ll post again once I have something worthwhile posting.

Clear skies.