Hello again. Welcome back to another instalment of the DAA blog!
I’ve been quite busy and quite active this summer when it comes to photography. I’ve been out shooting almost every weekend where the weather cooperates. Anyone who’s been following me on Facebook, Flickr, and Twitter will know I’ve published a lot of pics over the last few months. I’m even beginning to think that now I no longer can call myself a novice at astrophotography. I believe I’ve stepped into the the “intermediate” category. I’m still learning, but I’m at a stage now where I’m experienced enough to know what I need to do, what not to do, and understand how my different settings on my camera will affect my final product.
Continue reading “Good Advice for for the (Starry) Night Life”
Year: 2015
Dew Control, Ghetto Style: Keeping Your Optics Dew-Free On A Budget
Dew. It’s the enemy of anyone outside at night with optics. It will form on your lenses or mirrors and bring an end to your observing or photography session. Any night photography enthusiast who lives in a humid climate has likely encountered this hindrance, and has likely lost a couple of photo session due to it.
As astronomers and astrophotographers, we’re all aware of dew control solutions. The cheapest solution for Cassegrain-style scopes and comes in the form of a dew shield. It extends past the corrector plate and helps mitigate dew formation. However, that doesn’t help much when pointing straight up. And even when shooting lower to the horizon, a dew shield will at most buy you a bit of time.
The most reliable dew control is using dew heaters. But it’s not cheap. Heating strips for most telescopes will set you back at least $100, and you still need to buy the controller, which can range anywhere form cheap 2-channel controllers for $100, to multi-channel for several hundred dollars. All serious astronomers will likely get a real dew control system at some point. But for someone just starting out and in need of a lot of gear, forking out $200 plus buying a heavy-duty battery that can handle the stress of dew heaters is not necessarily feasible. Continue reading “Dew Control, Ghetto Style: Keeping Your Optics Dew-Free On A Budget”
How To Shoot The Milky Way And Night Sky With A DSLR Camera
(Blog updated November 2016)
Shooting the night sky for the first time can be a daunting process that can be a challenge even for an experienced photographer doing it for the first time. You’re operating under a completely different set of rules than you would shooting more typical targets in either natural or artificial light. So I figured I would put together this brief guide outlining what equipment is needed and the technique to get the best results out of your time under the stars. Continue reading “How To Shoot The Milky Way And Night Sky With A DSLR Camera”
When The Stars Align
So it’s been a while since my last writeup. I guess I could and SHOULD have written some stuff, because I’ve been quite busy on the astro-front this summer. Anyone who’s following my Facebook page, the different Facebook groups I’m a member of, or my Flickr page will see I’ve been quite busy with photography!
Not only have I been taking pics of the sky, but I’ve been branching out a bit learning to use my camera on stuff that isn’t in space for a change! So far, it’s been mostly landscape, cityscape and night photography. I’ve also been dabbling in time lapse photography, which I’ve really been enjoying. As a result, I didn’t want my wonderful Nikon D7000 to be permanently attached to my scope. And I like this camera specifically because the 16 MP sensor in the D7000 has the best low light performance of any other Nikon or Canon crop sensor. So I decided that rather than buying another expensive camera, I would get myself a used Nikon D5100, which shares the same sensor and processor as the D7000. This camera is lighter on features, so it would become my main astro-camera (to be full spectrum modded in the future) while my D7000 would be used to shoot other stuff. And I’ve been getting a lot of use out of both! For the $325 I paid for my D5100, it was a brilliant purchase! Continue reading “When The Stars Align”
Hitting The Mark
Since I started doing astrophotography almost 3 years ago, it’s been a learning curve. I never stop learning new things. I can see my constant improvement as I move ahead, but despite that, I’m still my own worst critic.
I’ve had a few images that people have raved over. Yet, I look at them and I see flaws, faults, errors, and think of all the ways I could have done it better. And in many cases, I’ve revisited the subjects in question and have improved them significantly. Still not always to where I would want them to be, but improvements nonetheless. I went over this self-criticism and how it’s helped me improve my work in my Sept 2014 blog entry Striving For Continuous Improvement Instead of Perfection.
While I’ve had some very good results over the past 3 years, I always look at my work critically and think that there’s room for improvement. And rightfully so, because things can almost always be done better. That’s how we improve at our craft. Continue reading “Hitting The Mark”
SHOOTING SCHEDULE
Finally, winter is slowly releasing its icy grip on me. While the weather is still quite cold, the overnight temperatures are slowly creeping up towards and above the freezing point. This means that my equipment will finally start working properly again. And that means, new picture-taking opportunities! Continue reading “SHOOTING SCHEDULE”
My Original Astro Photo Revisited and Reprocessed
Hi everyone. First off, I have to say it’s nice to be writing this. It’s been over 3 months since my last entry, and almost as long since I’ve been out with my gear. Winter has been rough, to say the least. Mountains of snow and bitter cold have prevented me from going out with my gear.
Winter is when the skies are the less turbulent. Many night I looked at the Clear Sky Chart to see excellent seeing and transparency – far better than normal conditions I get around here. Unfortunately, I’m also looking at nights where the temperatures are dipping to -20º C or colder.
It’s easy to dress for the cold and stay warm. And when imaging in less than hospitable temperatures, I usually sit in my car with the heat or A/C on and wait out the imaging session. But the cold really does play havoc on my gear. Electronics don’t like cold. And the more digital and high tech my setup gets, the less it likes the cold. My hand controller’s display pretty much stops working at temperatures below -5º C, so I’m not even able to do my basic mount alignment. My laptop doesn’t like the cold either. The display tends to get wonky and it generally performs very poorly. And there’s also the issue of batteries. My camera’s batteries which can normally give me 3 hours of continual shooting will barely last 30 mins in that kind of cold. Even my deep cycle marine battery that I use to power my scope, laptop and other accessories fails to hold up in this kind of cold.
So as per usual, December to March are pretty much months where I have to feed my astronomy fix by simply looking at images other people have posted. But now that the weather is warming up, I’m getting my gear squared away and getting ready for some great shoots. Finally having an auto guider set up will allow me to shoot some targets that I had previously attempted, but never managed to get to my satisfaction.
One such target is M51 – The Whirlpool Galaxy. This object is one of my favourites, and holds a special place with me as it was the first deep space object I ever photographed back in September 2013. I didn’t own any type of camera other than a point and shoot at the time and knew nothing about photography. I had a telescope, and my friend Kevin had a Nikon D60 and a T-mount and scope adapter. So we connected his camera to my 8″ Meade LX90 and proceeded to attempt to shoot M51
The results were mixed. We did manage to capture our target, despite many mistakes being made along the way. At the end of the photo session, we had 50 useable 10 second exposures of M51, and some questionable calibration frames (accidentally switched to a lower ISO setting for the darks and bias), But nonetheless, we had captures something.
The next step was a real trial by fire. I basically knew about post-processing. I watched several tutorial videos on YouTube on how to stack images in DeepSkyStacker and editing in Photoshop. I didn’t really understand what I was doing, but I was mimicking what I was seeing. And at the end of it, I got an image of M51. It wasn’t great, but nonetheless, both Kevin and I were ecstatic about the result. We didn’t think we’d actually captured anything useful at all at first, so it was nice to see we had succeeded. It wasn’t a great image by any stretch of the imagination, but all things considered, it certainly wasn’t a failure. It showed that we were at least on the right track. And important lessons were learned along the way.
 |
| My very first deep sky image |
Earlier this evening (which will be yesterday by the time this is published), I was sorting through old data and found my original images. I decided to try stacking it again and running it through Photoshop using the tools and experience I had built up over the last 30 or so months since this image was originally taken. I wanted to see just how bad or good that original data was.
After about 45 minutes of playing around, I was pretty impressed with the results. The background was far noisier than I had expected, but I wasn’t surprised considering the sky conditions at the time and the fact the calibration frames were bad. But I like the result. Now that I know how to colour balance my images, I was able to make it look a lot more natural. I also didn’t burn the cores of the galaxies out when stretching the histogram. And I managed to pull a lot more detail and contrast out of the spiral arms and the surrounding clouds of stars and dust – details that were invisible in the original image. But the part that surprised me the most though was that we managed to get this kind of detail with only 8½ minutes of integration time.
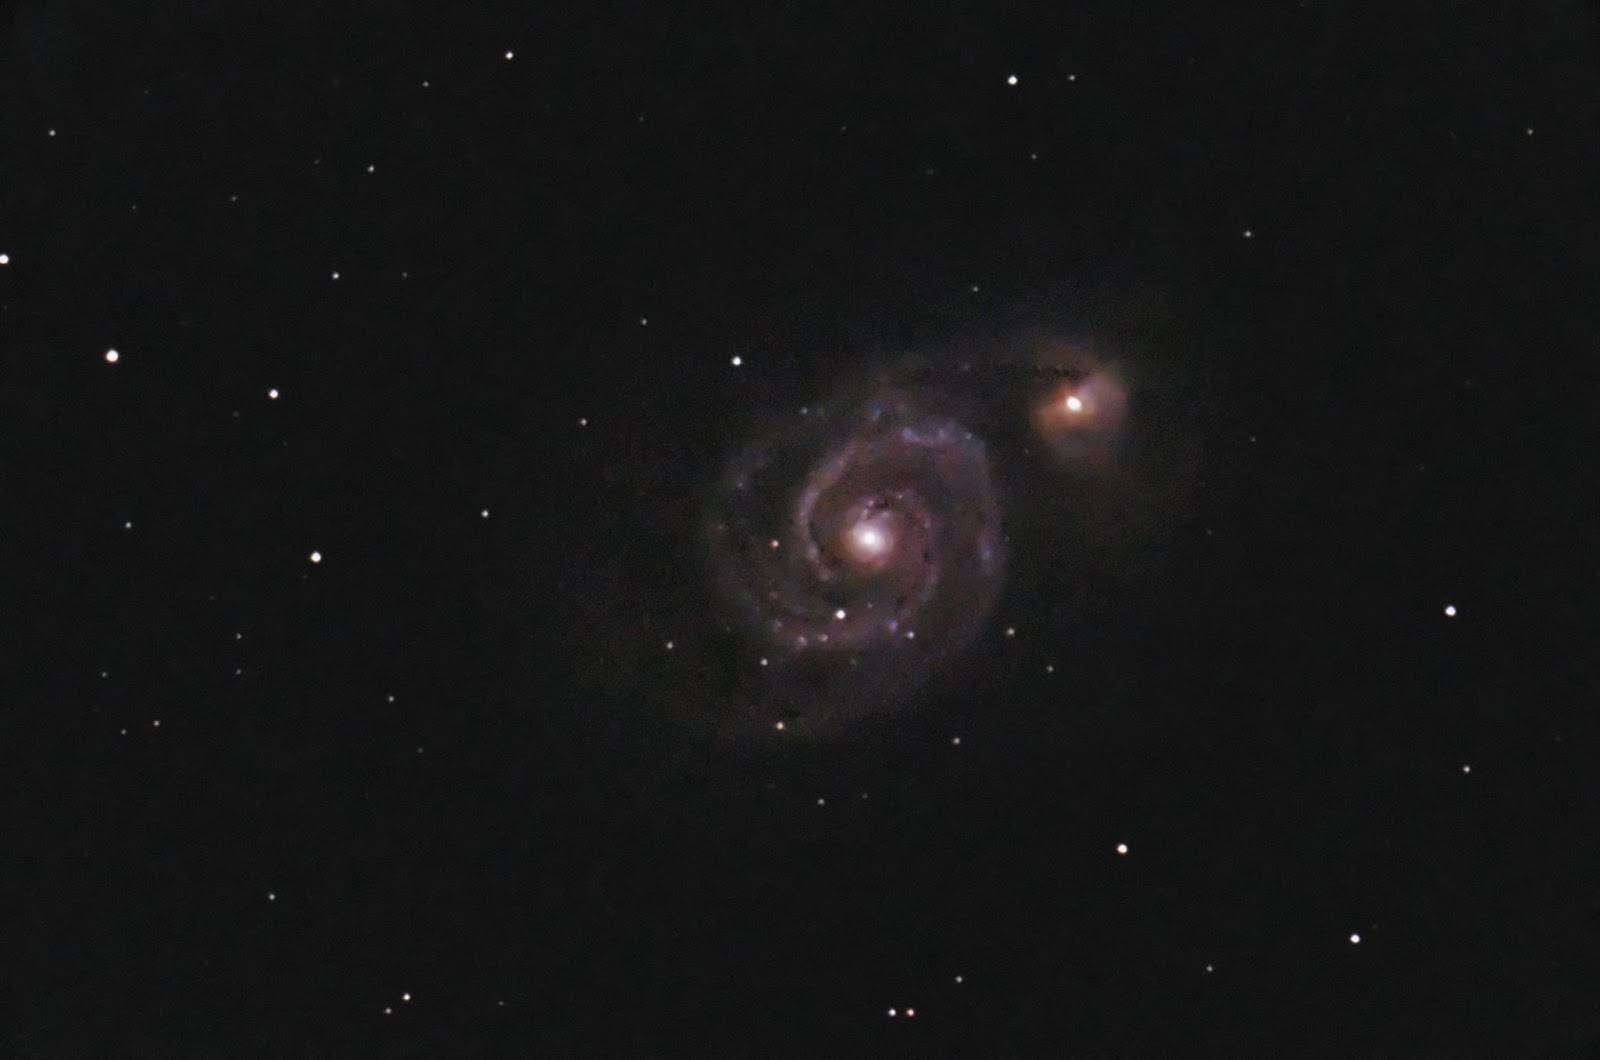 |
| Reprocessed data from my original M51 image |
All in all, this image is what it is – my first attempt at astrophotography. It was shot under poor seeing conditions and light pollution with a low end DSLR by a couple of guys with no experience. Not too bad considering it’s faint galaxy 35 million light years away. I’m quite impressed with how good it actually turned out now that I see it processed properly. And it motivates me to capture this object again soon.
Experience and equipment were limiting factors at the time this image was taken. I’ve since taken much better images of M51 using my 120 mm, f/5 refractor while my larger scope was out for repairs, but long to get high resolutions, long exposure images of it using my 8″ SCT. I tried on a couple of occasions last summer after I got my big scope back, but failed due to tracking issues and dew problems. By the time I got my kit together in late summer, M51 was far too low on the horizon to photograph, So I had to scratch M51 off my 2014 target list.
This year, I’m ready. My mount is ready. I have my autoguider which will allow me to take long exposures with perfect tracking. And I have my dew heaters to keep my primary and guide scope optics dry. This year I will finally manage to revisit M51 and capture images that will do it justice.
So until next time, clear skies and keep you eyes to the sky.